4 Fabrik Searchable Lists

One of the most important features of Fabrik is the ability to create searchable lists and tables based on data members enter into their Registration form. This powerful tool allows your members to interact with each other and build their own personal relationships with others in the community that share common interests. To explain how this process works, this chapter is divided into the following four sections.

4.1 Add Demo Members and Menus

4.2 Introduction to Fabrik Searchable Lists

4.3 Add a Fabrik Search Engine

4.4 Create a Custom Content Type

4.1 Add Demo Members and Menus

In the last article, we finished creating the Registration and Service Provider forms we need to run our new network. Both of these forms create a matching List where we can add new data just by clicking on the Add button in the back end of our website. In this article, we will first look at the Provider Info Form and List in the back end and then create menu items to look at the same form and list in the front end. We will then use our Member Registration Form to add our Demo Members and have our Demo Service providers fill out the Provider Info form to test how well our new network works.

View our Provider Info Form and List in the Back End
Go to Fabrik Forms, Service Provider Info and click View Data.

01

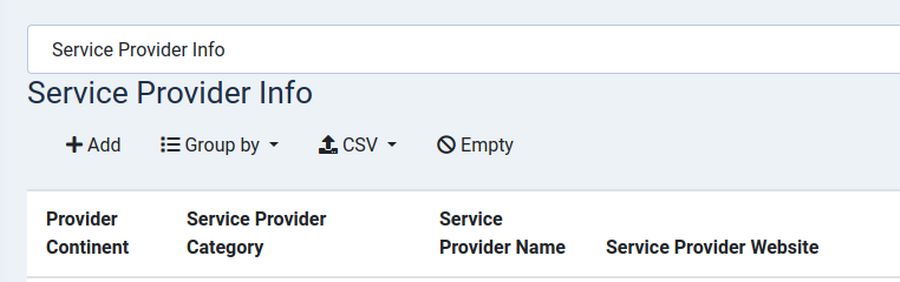
We have set the elements for this form so that the only elements shown on the List are Service Provider Continent, Service Provider Category Service Provider Name and Provider Website. Note that I have reordering the elements to put the Service Provider Continent first. We could add new service providers here in the back end if we wanted just by clicking on Add. We will eventually make the City, Name, Website and Email required fields – but leave the Provider City as an optional field. Note that there is no spam filter on the Provider Info form. The only form we will use a spam filter on is the Member Registration form. Click the back arrow to exit this screen. We will next create menu items to add our Demo Members in the front end.

4.2 Introduction to Fabrik Searchable Lists

In previous articles, we reviewed how to create a custom Registration form. We then created custom groups – each with their own Intros and Outros. We then added a series of elements to our custom Registration form – being careful to assign each element to one of our custom groups. Finally, we created 20 Demo Members which we added to create a series of records. These records can now be displayed in a searchable table that Fabrik calls a list. In this article, we will review how to customize our Fabrik List and Search functions.

Four Key Fabrik Functions

Fabrik has several different parts which all work together to help us build a custom community network. These include:

Forms - which contain groups of elements and are used to collect records from our members.

Groups - which are sections of our form used to help divide and organize our form into collections of elements.

Elements - which are the individual fields present on a form and the column names in your database table with each column holding the records entered using each element.

Lists - which take records collected from your form elements and display them in a searchable table.

Fabrik Settings, Parameters and Permissions
Each form, group, element and list has its own settings and parameters and viewing, editing and deleting rights. Menu items that link to these lists and forms also have their own access and display settings. Finally, if linking to a form in a module, the module also has its own access and display and permissions settings. Quite often, most of these settings and permissions can be left at their default values. Our goal is to cover just a few of these settings. Because this is a project based course, we cover these Fabrik settings and parameters in the order that they are needed to create our custom Registration form and Service Provider form and their matching Searchable Lists.

4.3 Add a Fabrik Search Engine

If you only have 9 Service Providers, you do not really need a custom search engine or filters or prefilters. But if you will eventually have more than one hundred Service Providers grouped into 6 continents and 4 or more categories– then a custom search engine becomes essential. Your Members can then search for a particular service category located on a particular continent. It is this combination of list by location combined with the ability to search by subject or category that makes Fabrik so useful for building a community of people in the same location and interested in the same subject. Your members can then view the Details for these service providers and choose two or three as final candidates to contact directly for more information.

Add a Fabrik Search Engine to your List
To add a Fabrik Search Engine to the top of your list, go to the Provider Info List Details Screen and click on the Filters Tab:

01

Filters are fields that are used by the search engine to help your members find what they are looking for by filtering the list's data based on the data values. The filter trigger determines when the filter is applied. Leave it set for on change. Leave the location at Above. Change Advanced Search from No to Yes. Click Save.

Benefits of the Fabrik Advanced Search Option
Fabrik offers at least four kinds of search engines. The two shown on the List Details Filters Tab are called Advanced Search and Search All. The Search All engine works well in the Joomla administrator Control Panel View Data screen. But Search All does not work on our front end List page. This is likely because Search All has a conflict with some setting on our Helix template.

Thankfully, the Fabrik Advanced Search option displays well and works well on the front end of our website. Advanced Search also has a setting in each element in the List View Settings screen Filters tab to precisely define what elements appear in the Advanced Search options. So we will use the Advanced Search option on the front of our website and Search All on the back end of our website.

4.4 Create a Custom Content Type

It can be a lot of work creating a custom registration form or a custom service provider form. If you manage several websites, you may want to export the form to another website. Alternately, you may want to offer it as a free download to other Fabrik users. Alternately, you may want to export your forms to a DEMO website for testing purposes. In this article, we will look at the process for creating, exporting and importing a custom content type.

What is a Fabrik Content Type?
When creating a new List in Fabrik, you give the List a name and a database name. Then click Save. You will then be presented with a screen where you can choose one of the three default Content Types. If you choose one, Fabrik will automatically create not only the list, but groups, forms and elements.

Steps to Create a New Content Type

#1 Select the Form you want to use to create a content type.
Go to Components, Fabrik, Forms. We will choose the Member Registration form.

#2 Create the new Content Type
In the Content Type column, click the tiny Down Arrow. Then click Export. Fabrik will reply, Content Type Created.

#3 Download the Content Type
Then click the Content Type tiny arrow again. This time, click the Download button. Fabrik will download a zipped file.