
When you fill out your Service or Job Provider form, you can upload your own custom Provider image. In this article, we will review how to create a custom Provider image.
Step 1: Pick out an image that is wider than it is tall
Pick out an image that is about one and a half times as wide as it is tall. Our goal is to create an image that is 300 pixels wide, 185 pixels high and with a file size under 100 KB. Here is an example of such an image:

Step 2: Download and install LibreOffice
LibreOffice is a free program that is much more secure than Microsoft Office. Versions are available for Windows, Apple and Linux. To download it, go to this link: https://www.libreoffice.org/download/download/
Then click Download to download it to your computer. Then click on the program to install it. Click on it to open a new Libre Writer document.
Step 3 Use Libre Writer to Compress and Save your image
Copy paste your profile image into a Libre Writer document. Then right click on the image and click Compress.
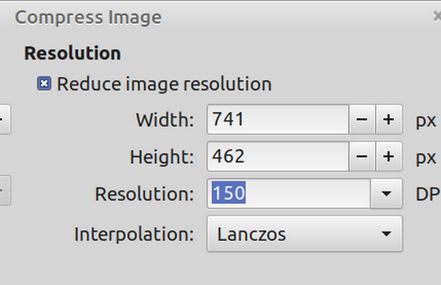
Change the resolution to 150 dpi. Then click OK. Then right click on the image again and click Save to save the image to your file manager. The image file name should be lower case with no spaces.
Step 4: Use an image editor to Resize and Crop your image
Next resize each image to a width of 300px. Then click Crop and reduce the height of the image to 185px. There are many Linux graphics programs that Resize and Crop images. Debian has a free tool called Gthumb. But any graphic editing tool will do.
Step 5: Rename and Save your finished image to your File Manager
Save your custom image as a file with a name using lower case letters and no spaces. Here is an example: provider01-300.
Here is one of our Carpentry images compressed to 150 DPI with its file name above it: provider01-300

Step 6: Load you custom Provider image to your Service or Job Provider form
Log into your Member area with your Username and password. Then click on your Provider Signup form to open it. Scroll down to the Provider Photo Browse button:
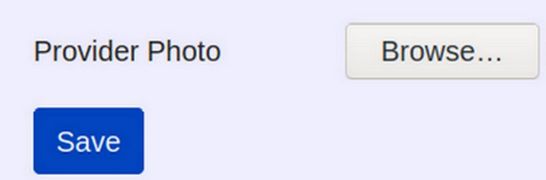
Click Browse. Find and select the image file. Then click Save. It will reply with Record Added and return us to the First Steps for New Members page.
Need help?
Reach out to us and a member of our network will help you create your Provider image. Thanks for reading this article and thanks for being a Service or Job Provider for our community network!