3 Fabrik Forms and Groups

The Fabrik Community Building process begins with the creation of a custom Fabrik Registration form to replace the default Joomla Registration form. While other forms can be added over time, creating a unique custom Member Registration form is the key to building your community network. Fabrik forms can be divided into sections which Fabrik calls Groups. Fabrik groups help us divide a complex form into smaller sections each with its own collection of questions - which Fabrik calls elements. In Joomla, these groups of elements are also known as a field set. This chapter will review how to create a custom Member Registration form and custom Groups with custom Elements.

This chapter is divided into the following four articles:

3.1 Create your Member Registration Form

3.2 Add Custom Groups and Elements

3.3 Finish your Member Registration Form

3.4 Create Service Provider Info Forms

3.1 Create your Custom Member Registration Form

One of the most effective ways to reach a goal or solve a problem is for humans to form a community to work together to achieve a common shared purpose. Fabrik can help us form a more interactive online community. One of the most important steps in building an online community network is creating a custom Member Registration form. While the Joomla Content Management System is a strong foundation for any website, the default Joomla Registration form suffers from two major problems. First, it is not customizable. It can not be adapted to the specific needs of our community network. Second, the default Joomla Registration form does not display a searchable list. Thus, there is no way for members to interact with other members. We will use Fabrik to create custom forms and searchable lists to help community members interact with each other.

Here is an outline of the Fabrik Registration Form Creation Process:

01

Additional lists and forms to join to the Registration Form
While all members will sign up with the custom Registration form, it is useful to have a separate forms for our special Service Provider members. This will allow us to collect additional information from our Service Provider members and display this information on its own list. It is also useful to allow Service Providers to be able to add their own Provider Category to the Provider Table. We will therefore also create a special Provider Category table. We will then use Fabrik to link these 3 lists, forms and tables together.

3.2 Registration Form Groups and Elements

In the last article, we created our custom Member Registration form. In this article, we will finish building this form. There are three basic steps to completing our custom Member Registration form. The first step is to decide which elements should be used in the Member Registration form and how these elements should be grouped. The second step is to create the groups that we will use on the Member Registration form. The third step is to add elements to each of our Member Registration form groups. In this article, we will take a closer look at all three of these steps.

Step 1 Decide which elements should be used in your Member Registration Form
Fabrik Forms can be divided into two different Types. These two types are New Member Registration forms (forms that create a new member) and Existing Member Information forms (forms that collect information about existing members but do not create a new member). These two types of forms use different elements because the Fabrik New Member Registration form needs to have elements that precisely replace and sync with the elements in the Joomla Registration form - while Fabrik Existing Member Information forms can contain any kind of information you need but should not contain any of the elements used in the New Member Registration form.

This separation of New Member Registration forms versus Existing Member Information forms is so important that I have created this graphic to help us remember the difference between these two types of Fabrik forms:

01

With Fabrik Existing Member Information forms, it is common to simply keep all of the questions in the default Fabrik group that is automatically created when you create the form and has the same name as the form. However, to clearly separate elements or questions needed to replace the normal Joomla Registration form questions, it is useful to divide your New Member Registration form questions into at least five groups.

The first group will be to hold some of the hidden Admin fields we will need when we create our Member Registration form. We will call this group 0 Admin Info. The second group of questions will be only those questions needed to replace the Joomla Registration form questions. We will call this group 1 Member Info. The third group will contain any other questions you want to ask new members. We will call this group 2 Member Benefits. The fourth group contains questions where members can indicate options they want. We will call this group 3 Member Options. The last group is used to separate the Form Spam Filter from the rest of the form. We will call this group 4 Prove you are human. You can add more groups of questions if you have a very long form that you need to break up. But for the sake of simplicity, we will just use these five basic groups. Therefore, in Step 2 below, we will create the five following groups:

3.3 Finish Your Member Registration Form

In our last article, we added elements to the first two groups in our custom Member Registration form. These elements are needed to connect our Fabrik Registration form with the Joomla User Management system. In this article, we will use the J User Plugin to connect our Fabrik elements to their Joomla elements. We will then finish adding the remaining elements needed for our custom Member Registration form.

Connect Your Fabrik Member Registration Elements with their Corresponding Joomla Core Registration Fields
These elements are the basic Joomla user registration fields. However, your Joomla database does not know these elements exist. We need to connect these elements to our Joomla database. Click on Forms and click on your Member Registration form to open it. Then click the Plug-ins tab.

01

Then click Add. For the -- do -- setting, select juser. For the In setting, select Both. For the On setting, select Both.

02

A new set of fields will appear below these fields called Binds data to a Joomla user account. It opens in the Fields tab. We will use this area to connect our Fabrik registration elements with their Joomla counterparts. In the Name field, select Member Full Name. For Username, select Member Username. For Password, select Member Password. For Email, select Member Email. For the Joomla Block field, select Member Block. For the Joomla User ID field, select Userid. For the Joomla User group field, select Member User group. For the Joomla Password Reset field, select Member Password Reset.

3.4 Create a Service Provider Info Form

In our last article, we finished the Fabrik Member Registration form and matched its elements to the default Joomla Registration form elements so that we can replace the Joomla Registration form with our custom Member Registration form. In this article, we will create our Service Provider Info form.

Here are the steps to become approved as a Fabrik Friends Service Provider.

01

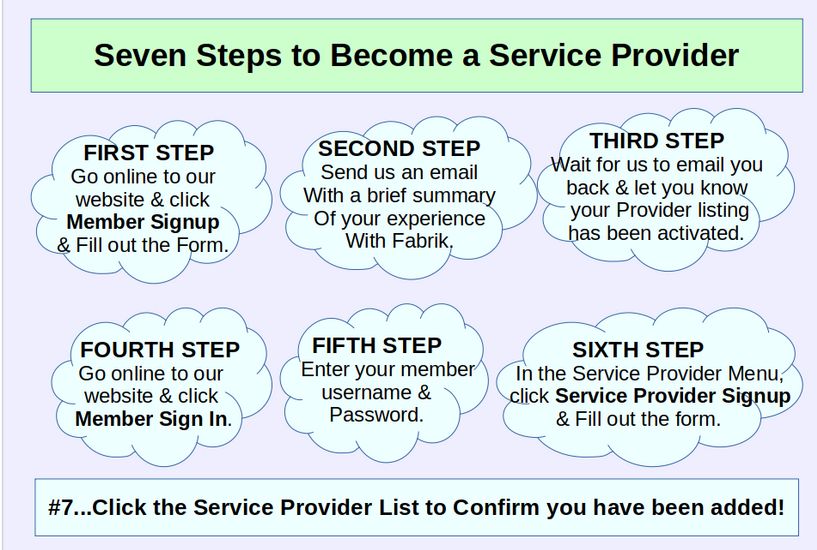
Here are the steps for creating the Fabrik Friends Service Provider form:

Create a Service Provider Info List
To create our Service Provider list, go to Fabrik Lists and click New. For Form Label, type Service Provider Info. Then click on the Data tab. For Table name, type: afc_service_provider_info Then click Save. Then Save and Close.

Add an Intro to the Service Provider Info Group
Rather than having the Service Provider Intro text at the beginning of the Service Provider Info form, it is better to place it inside the Service Provider Info Group. This will make it easier to hide this text on our Service Provider Profile Page. Here is the Service Provider Intro text:

Most of the fields are required as they are using by our Network Search Engine. For Provider Name, please indicate either the name of your business or your name and the name of your service. For provider email, please indicate your business email or your personal email. Service Provider categories include Fabrik Instructors, Fabrik Website Designers and Fabrik Application Developers. You can select 1 2 or all 3 categories. To select more than one category, hold down the Control Key. After your listing has been activated, you can use the Service Provider Profile Page to provide more details about the service you are offering including images and videos if you wish. To add an image, simply click on the Image Icon in the editor. To add a link to another web page, click on the link icon. You can also change the font family, font size and font color. Please read our article on how to create your own Provider Photo before you upload your Provider Photo.

Click Save. Because we do not want to show this description, and several other elements on the Service Provider Details page, click the Layout tab. Change Show in form/details from Yes to Yes but hidden (details only). Then click Save and Close.

Create a Fabrik Group called Provider Details
We need a separate group to hold our Service Provider Name element, Provider Email element and Provider Website element. Go to Groups, click New. For label, type Provider Details. For name, type provider-details. For form, select the Service Provider Info form. Leave the Intro box blank. Then click Save. Then click on the Layout tab. Note that Show in form/details is set for Yes. Leave it at Yes and click Save and Close.

All elements in the Service Provider Info form except the Service Provider name, email and website elements, will be in the default Service Provider Info group.

Add Service Provider Name Box
Go to the Service Provider Info form and click Add. For Label, copy paste: Service Provider Name For Name, copy paste: service_provider_name. For Plugin, leave it at field. For group, select Provider Details. Then click Save and New.

Add a Service Provider Email Box
For Label, copy paste: Service Provider Email. For Name, copy paste: service_provider_email. For Plugin, leave it at field. For group, leave it at Provider Details. Then click on the Advanced tab and for Input type, select Email. Then click Save and New.

Add a Service Provider Website Box
For Label, type Service Provider Website. For Name, type service_provider_website. For plugin, leave it at Field. For Group, select Provider Details. Then click on the Advanced tab and change Input type to URL. Then click the Guess Link Type tab and change Guess Link Type to Yes and change Link Target to Open in a new window. Then click Save and New.

Add a Service Provider City box
For Label, type Service Provider City. For Name, type service_provider_city. For plugin, leave it at Field. For Group, select Service Provider Info. Then click Save and Close.

Add Service Provider Continent and Service Category Forms
We still need to add 3 more elements to our Service Provider Info form. These are Provider Category, Provider Continent and Provider Profile Page. However, because they have several options and we want these to be searchable, we first need to create special Provider Continent and Provider Category forms. Because the Provider Continent and Provider Category need their own custom form, we will add the Provider Continent and Provider Category elements to our Service Provider Info form AFTER creating these two special forms.