
Joomla Access Levels are a way of more precisely defining what groups can see in the front end of our website. Access Levels are also useful for creating custom groups to precisely define what each custom group can see in the front end of our website. Pages and Categories can not only be assigned to different groups with precise permissions – but they can also be assigned to precise Access Levels. But Access Levels can be a bit confusing because folks tend to confuse Access Levels with Groups. As we will see, you can have several groups with the same access level even though each group has different permissions in terms of what each group can do.
Here is a diagram of how the Joomla Access Control System works:
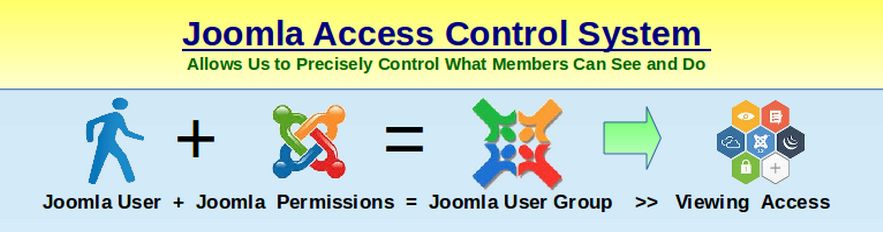
A new member begins by filling out the website registration form. This makes them a member of our organization. Members can then be assigned to one or more groups by anyone in the organization with authority to assign them to a group. Each Group that a member is assigned to come with certain permissions which allows the member of that group to take certain actions.
Joomla allows creation of any number of groups - each of which can be assigned their own precise Permissions. In addition, each Joomla group can be assigned to a precise Joomla Access Viewing Level (and new Access viewing levels can be created) which define which pages the group can view.
What Joomla does when a person logs into a website is to first check the group they belong to. Joomla then checks the permissions they group has. Joomla finally checks the access level the group has. Only if all three conditions are met (Group, Permissions and Access Level) is the page or menu item displayed.
This is why Joomla is one of the most secure and customizable web platforms in existence. For comparison, another popular web building platform, Wordpress only has four types of user groups and no way in its core to add user groups, change permissions or assign access levels. There are Wordpress Plugins that do some of this. But because these plugins are outside of the core, they are not secure and they are not reliable. To see the default Joomla Access Levels, click on Users, Access Levels:
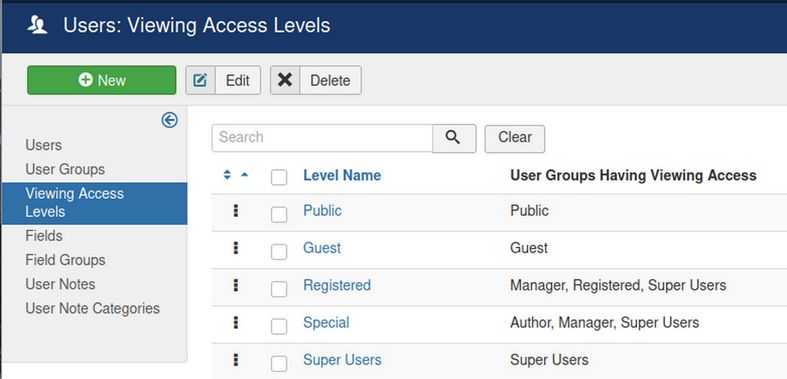
The default access levels are Public, Guest, Registered, Special and Super User. Click on the Public Access Level and you will see it is only assigned to the Public Group. Guest is connected with the Guest Group. But Registered is connected with the Manager Group, the Registered Group and the Super User Group.
Why is the Registered Access level assigned to the Manager group and Super User group but not the Administrator Group?
The answer is that the Administrator group inherits all the permissions of the Manager group. So if Managers are allowed to see pages, categories and menu items, then Administrators are also. Registered is checked because it is on a separate “Front End” Permissions tree. Authors, Editors and Publishers do not have to be checked because they are all children of the Registered group. They therefore inherit the permissions of the Registered group. But Super Users are not a child group of the Registered Group. They therefore have to be checked separately to have access to pages, categories and menu items that have been assigned to the Registered Access Level.
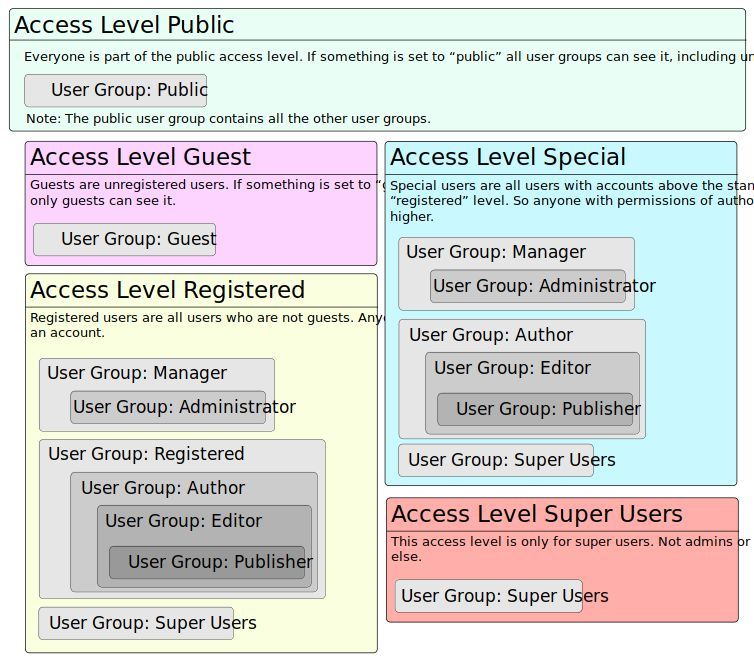
Here is a graphic showing the Joomla groups associated with each of the default Joomla Access Levels:
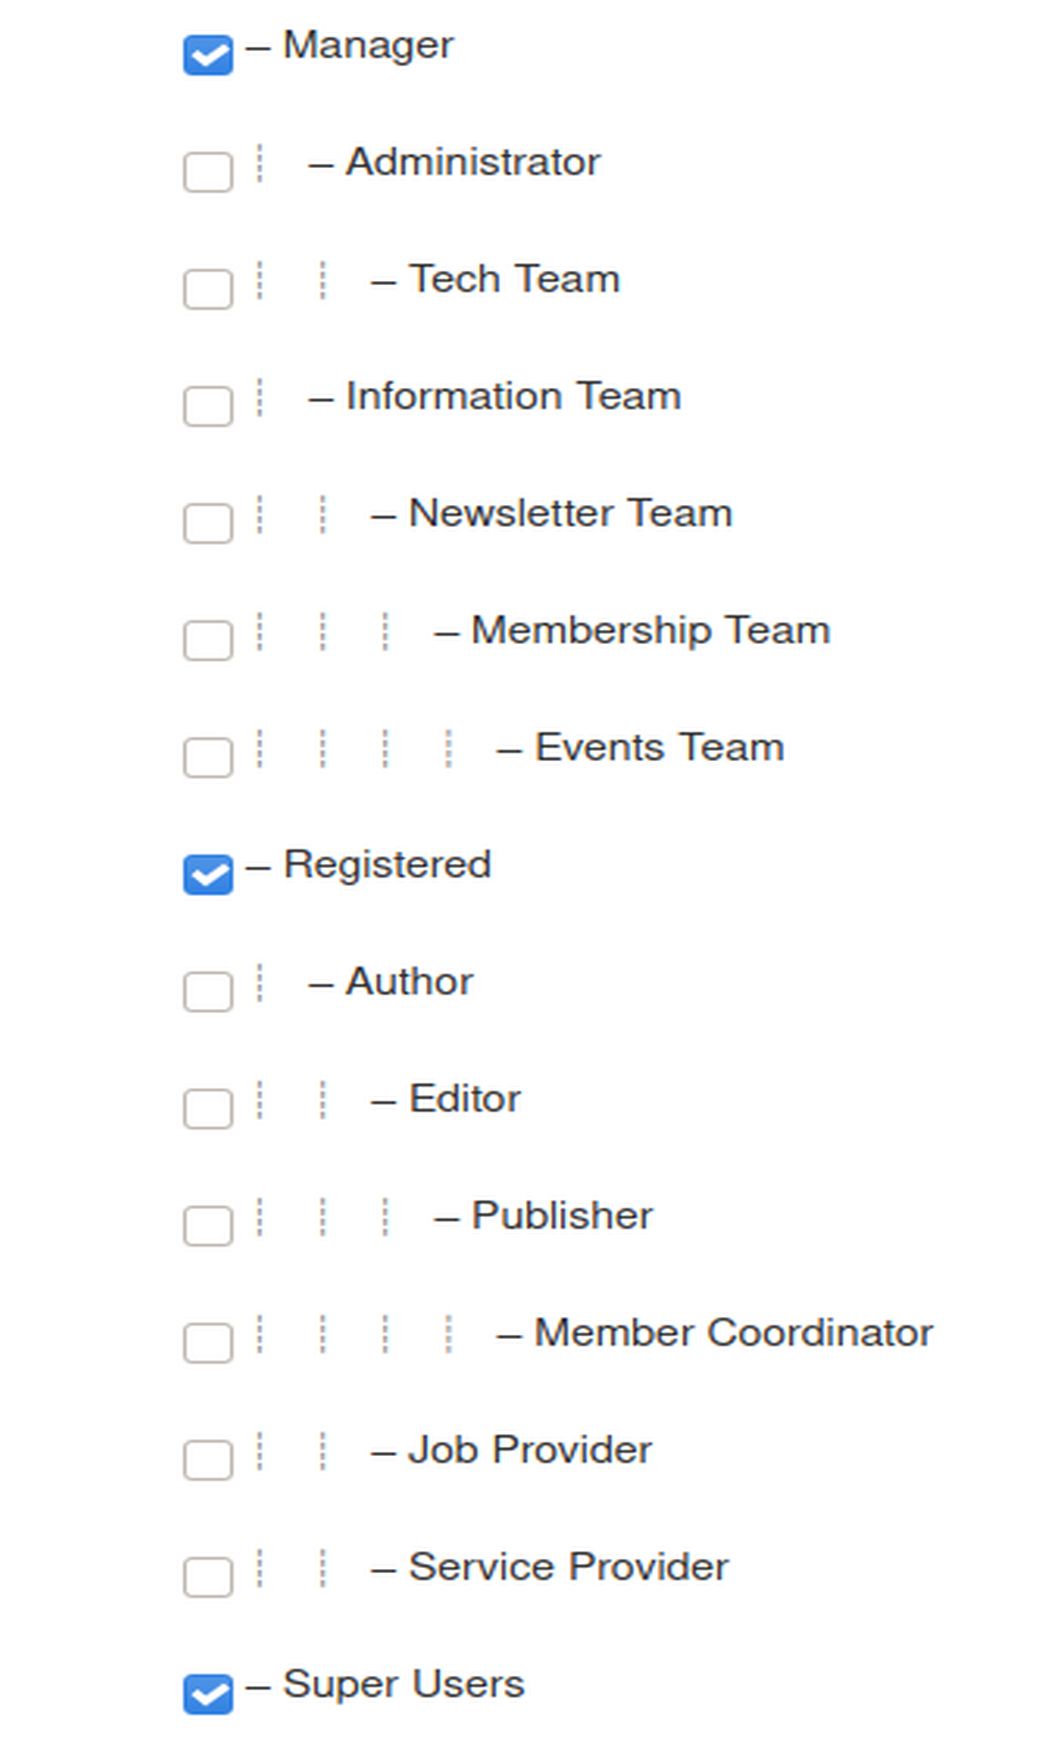
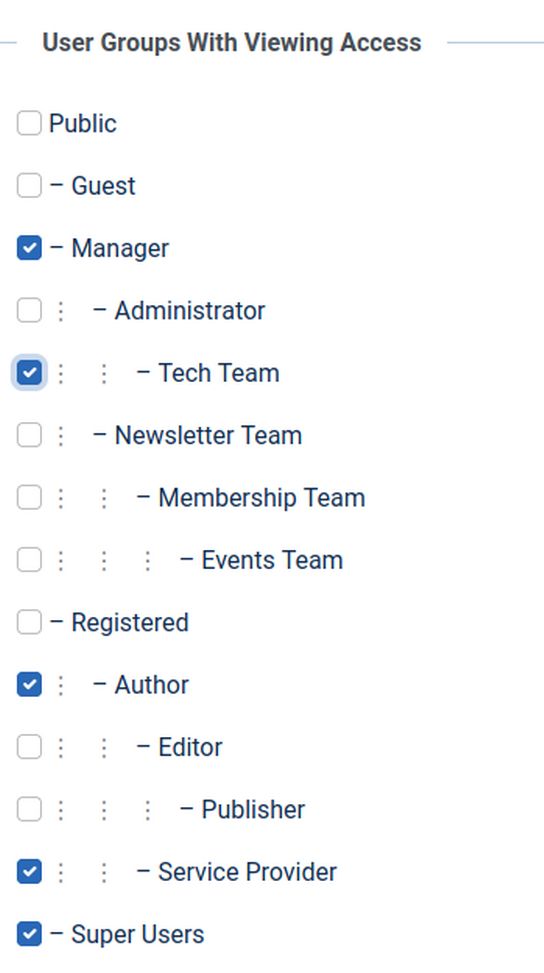
Look at the groups checked for the Registered Access Level:
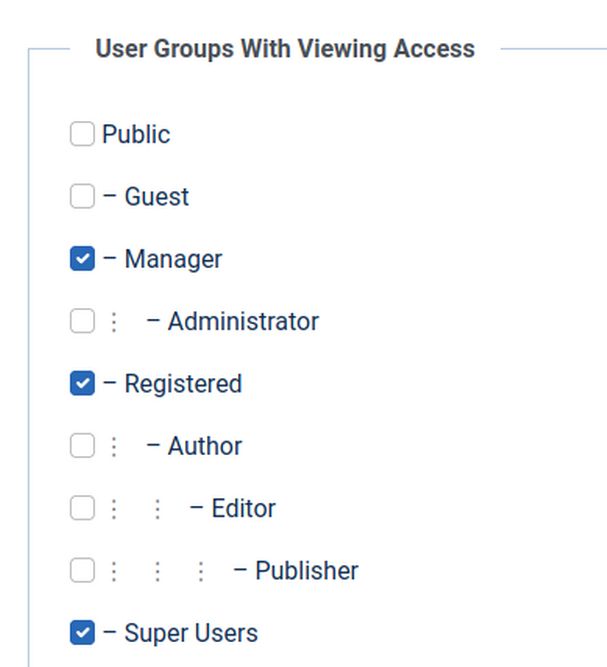
To determine which boxes to check, ask yourself “Which groups should be able to view articles, categories and menu items assigned to this access level?” Checking the above boxes allows all to access Registered areas except Public and Guest.
Next, click on the Special Access Level. The difference between this Special access level and the registered access level is that registered users are not allowed to see pages and take actions that only special users are allowed to see and do. Therefore the Registered Box has been unchecked. But the Manager box and the Author box are checked which will allow all Managers, Administrators, Authors, Editors and Publishers access to pages, categories menu items and actions that have been assigned to the Special Access Level.
Here is what the Special Access Level group assignments page looks like:
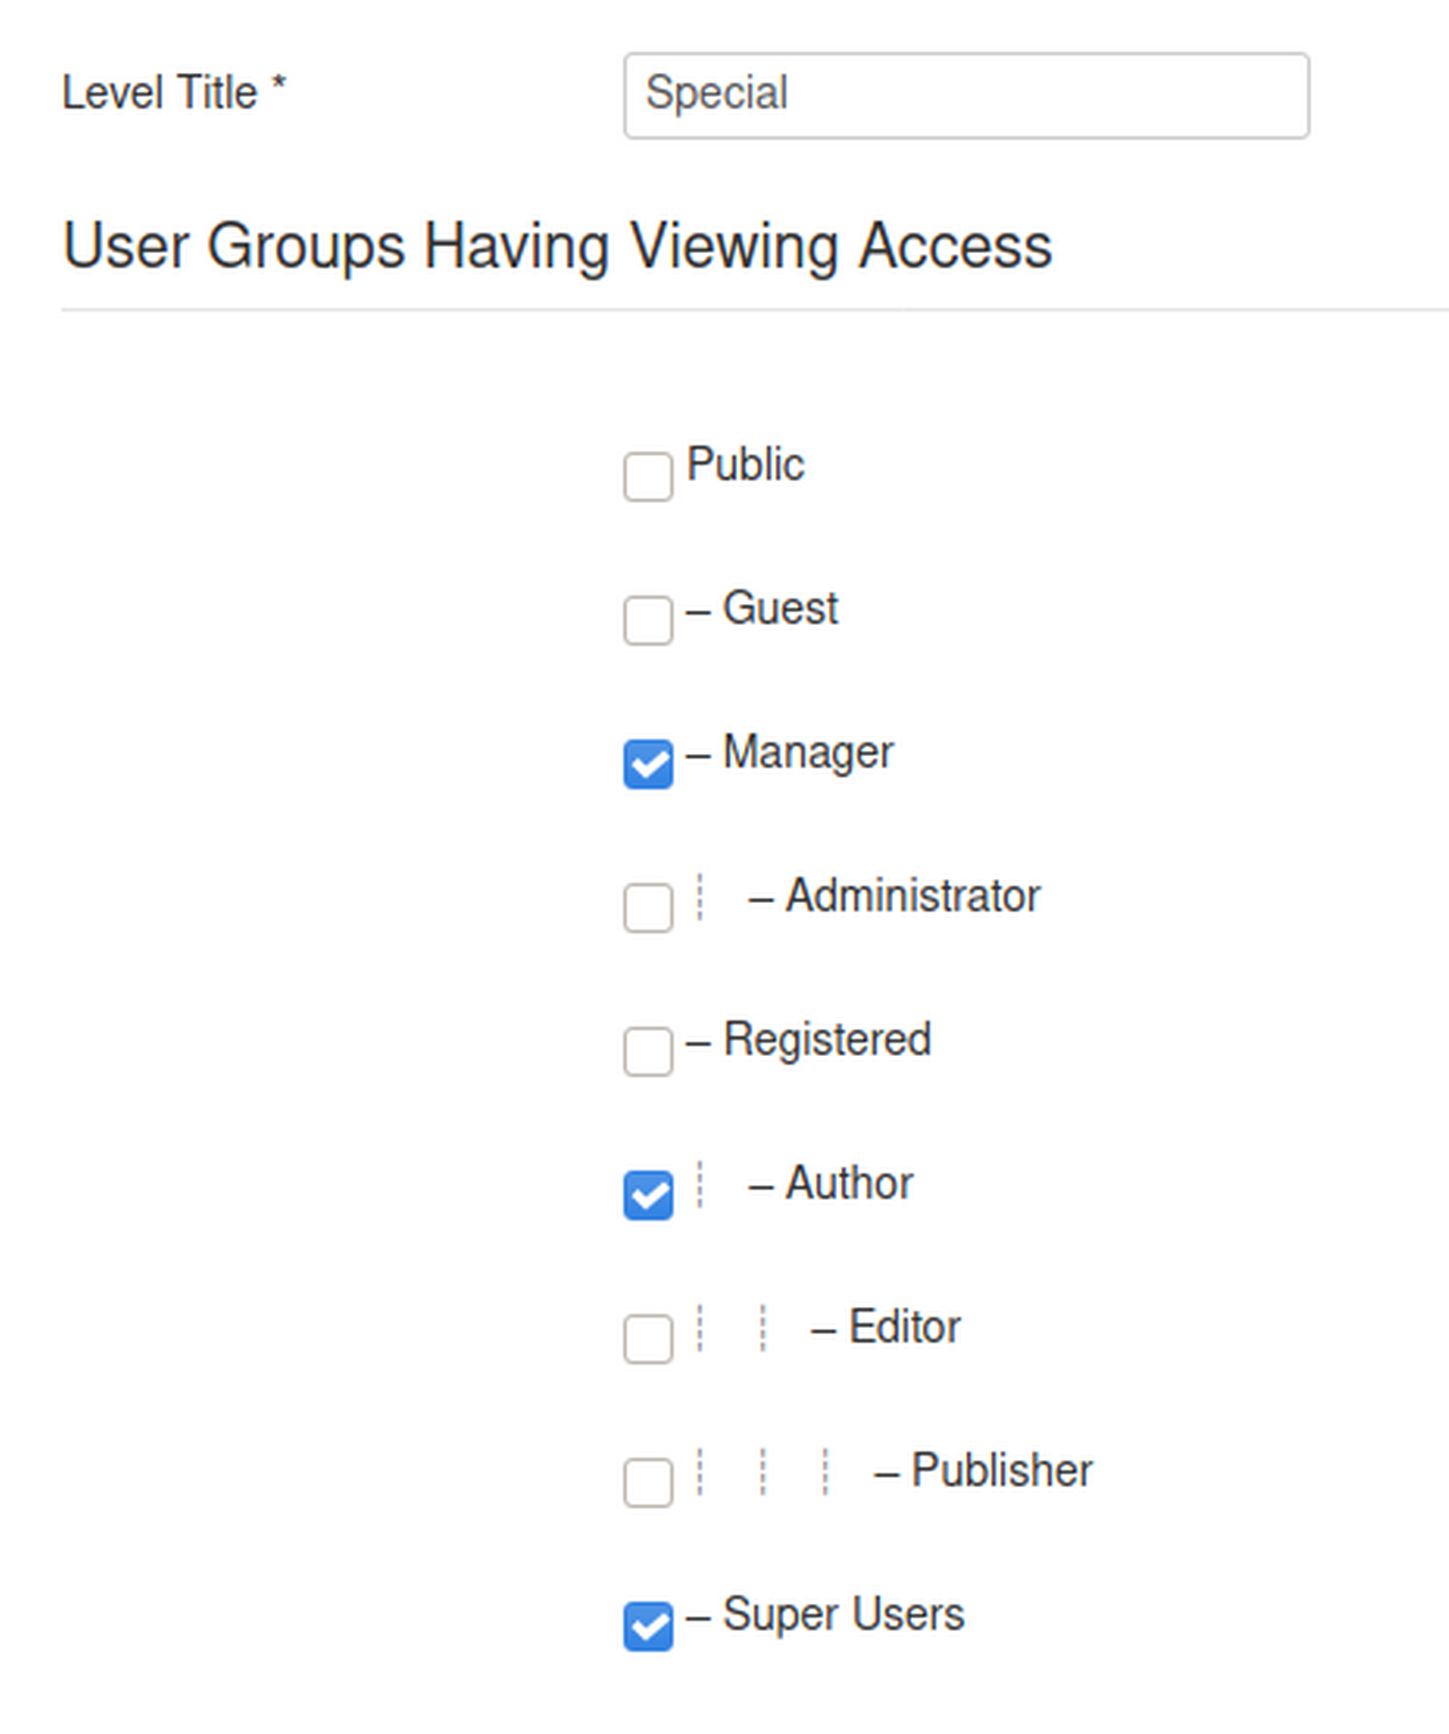
The box for Super Users also has to be checked in order to allow Super Users Access to all Special Pages and Menu items. Once again, this is because Super Users are not on the same Permission Tree as Authors, Editors and Published.
Finally, click on the Super User Access Level. The only group associated with this access level is the Super User group. Thus, areas assigned to Super Users can only be seen by Super Users.
Create a System of Custom Groups with Precise Permissions and Assess Levels
Now that we have a better understanding of Joomla User Groups, Permissions and Access Levels, we will use an example to show how these can be turned into custom groups with custom permissions and custom access levels. Rather than modifying the existing groups, we are better off to create the groups we want and add them to the existing groups by making them children of the existing groups.
We will create a custom access control system for a County Organization using the new roles of Tech Team, Membership Team, Events Team, Newsletter Team and Service Providers as well as granting special permissions for certain areas and tasks to our regular members (Registered Users). To do this, we will add four custom backend groups: Tech Team, Membership Team, Events Team and Newsletter Team. We will also add three custom Front End Only Groups: Service Providers, Job Providers and Member Coordinators. These will give us 8 new groups in which to assign the volunteers who will be running our local County website.
There are nine steps to setting up a system of custom Joomla groups.
#1… Create New User Groups as Children of Existing Groups.
#2… Create New Access Levels and Connect them to our new Custom User Groups.
#3… Create New Categories and define Access Levels of each category to match our custom user groups and access levels.
#4… Create New Articles and Assign Articles to Custom Categories or Assign Access Levels for Each New Article.
#5… Create an Administrator Menu to appear on the left side of the Front End whenever an administrator logs in.
#6… Create Menu Items to Display the Categories and Articles for each custom Group
#7… Assign at least 1 User to each new group so we can test it.
#8… Define Precise Permissions for Each Custom User Group.
#9… Test our New Access Control System.
Why did we put “Defining Permissions” as the Last step?
Nearly all Joomla Access Control tutorials list setting permissions as the second step – not the last step. The common practice is to create groups and then set permissions for those groups. You certainly can set permissions for a group any time after creating the group. The reason we put setting permissions last is to make it clear that once our system is set up, we can change and customize permissions anytime we want.
Also, waiting to set permissions at the end of the process will give us more time to reflect on what would be the best set of permissions for any particular group.
Let's review each of these 9 steps for creating a custom access control system.
#1… Create 4 New Back End User Groups as Children of Existing Groups
The first step in creating a new Joomla group is to assign it as a “child” to some other existing Joomla group. The child group will essentially be a copy of the parent group. We can then change the permissions and access of the child group to make the child group see and do exactly what we want (unlike real children).
Here is a Table defining our 4 new back end groups and the existing back end groups we will use for their parents:
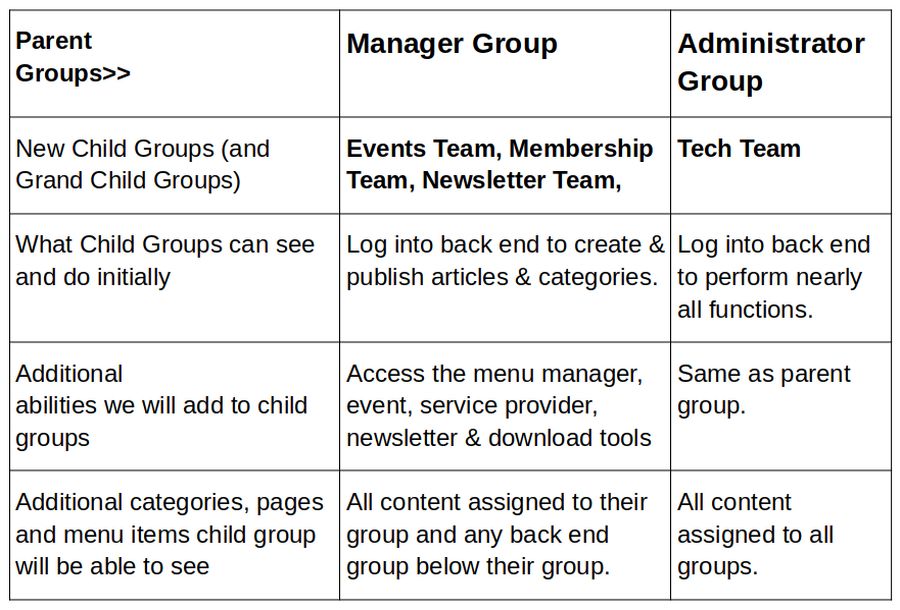
The above table is not quite correct because the parent of the Events Team group will be the Membership Team Group and the parent of the Membership Team group will be the Newsletter Team Group. So the only group that will be the actual child of the default Manager group will be the Newsletter Team group. All of the others will be “grandchildren” and “great-grandchildren” of the Managers Group.
Create 3 New Front End Groups as Children of existing Front End Groups
Our Backend groups have access to both the back end and the front end of our website. But front end groups only have access to the front end of the website. The default Front End Only groups are Author, Editor and Publisher. We will only use the Author and Editor.
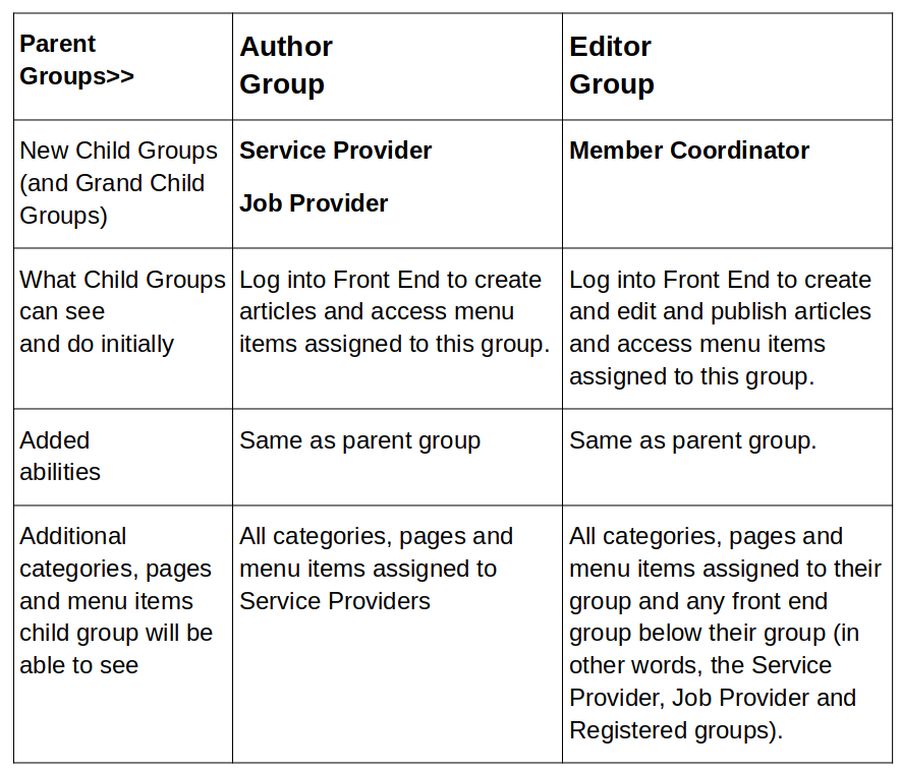
Here is a Table defining our 3 new front end groups and the existing front end groups we will use for their parents:
Why are we using Author as the Parent for the Service Provider group but Manager as the Parent Group of our Events Team, Membership Team and Newsletter Team groups and Administrator as the Parent Group for our Tech Team Group?
One of the least obvious decisions to make when setting up a new User Group, and the very first question we must answer is what group we should use as the parent group for our new groups. To simplify the process of setting permissions, we should choose a group that is similar to the custom group we want to create. This is because the new child group will inherit the Permissions of the original parent group.
However, there is an important principle that we want to add permissions for our new group rather than denying permissions. We therefore want to start with the least level of Permissions for our parent group. The Service Provider group has the exact same function as Joomla authors (to create articles in the front end of our website). Assigning them as children of the Author groups means they will have the same permissions as the Author group.
The Newsletter Team members are more trusted and therefore will be given access to the back end of our website where they will be given access to a few more actions. Assigning the Manager Group as the Parent group means that the Newsletter Team group will inherit the permissions of the Joomla Manager group. The Newsletter Team group will also get access to a few more tools such as the Newsletter tool – as well as access to the User Manager for adding new users and assigning roles to users. The Membership Team group will inherit the Permissions of the Newsletter Team and the Events Team will inherit the Permissions of the Membership Team. The Tech Team group is a child of the Joomla Administrator group because they will be actually running the website and will need access to even more tools. The only group with more access than the Tech Team group is the Super Users group.
Why not just use the default Joomla Administrator, Manager and Author User Groups instead of creating new custom groups that do about the same thing?
Creating our own custom groups will not only allow us to more precisely define the access and permissions, but it will make it easier for everyone in our group to understand what their roles are and what the roles of all the other members of our organization are. In addition, if we create custom groups, with custom permissions and access levels, we can have sections or categories of our website and menu items set up to only show for the Events Team, the Membership Team, the Newsletter Team, the Tech Team or Service Providers.
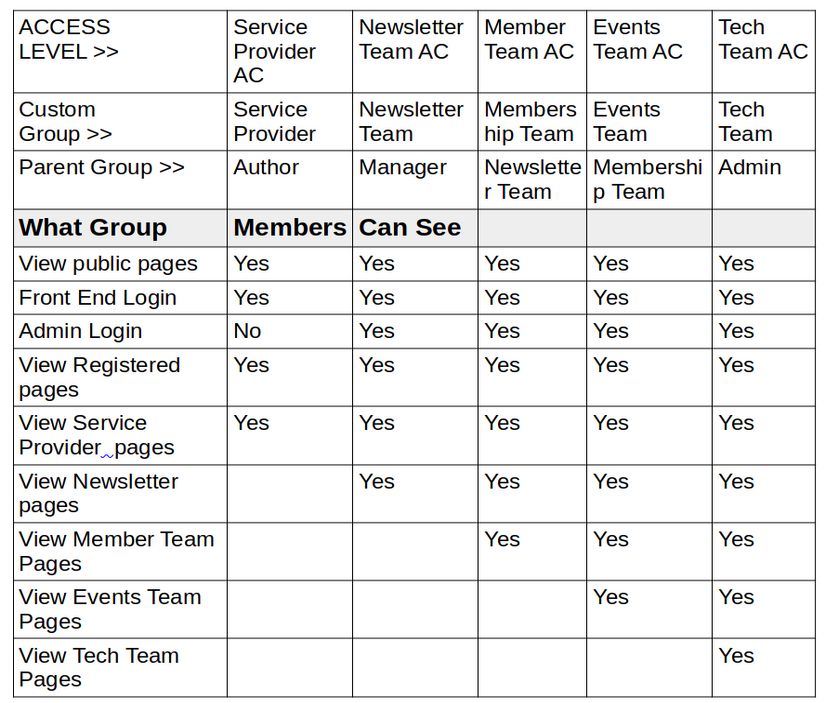
Below is a table showing the Custom groups with their associated access levels and permissions. It is a good idea to set up a table like this for your own community network before you create your custom groups so that you can refer back to it during the creation process.
Table of Custom Permissions for Custom Joomla User Groups
What Group Members Can See
What Group Members Can Do
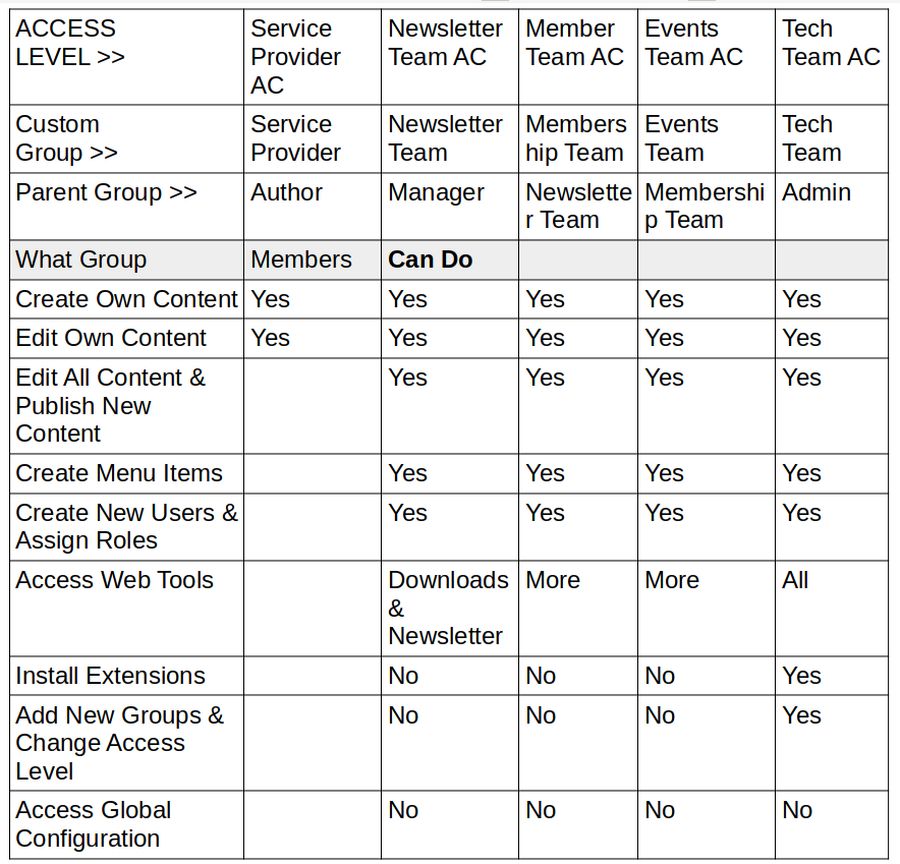
The lack of Back End access means that Job and Service Providers will create all of their articles on the front end of the website. This is preferable to allowing them back end access because there could be as many as 1000 Job or Service Providers. It is best to keep all these members on the front end of our website.
#1 Create our 3 Custom Front End Only Groups
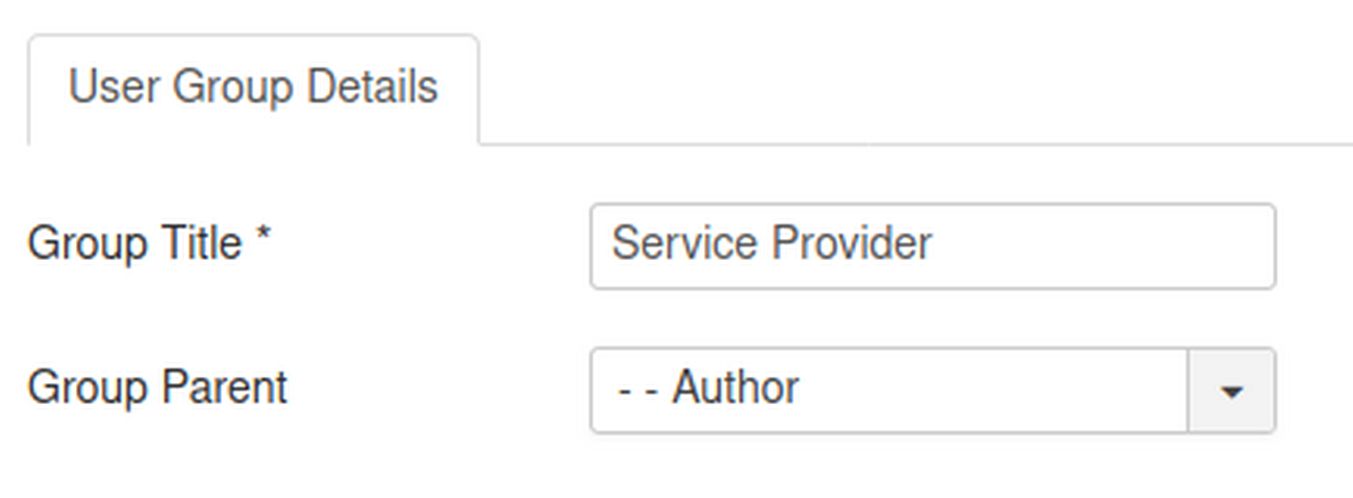
First, use the Joomla User Groups screen to create our six new groups. From the Joomla Control Panel, go to Users, Groups and click New. For the Group Title, type Service Provider and for Parent Group, click on Author.
Then click Save and Close. Then click New. For the next group title, type Job Provider. For the Group Parent select Author. Then click Save and New.
For the next group title, type Member Coordinator. For the parent, click Editors. Then click Save and New.
Create our 4 Custom Back End Groups
For the next group, type Newsletter Team. For parent group, click Manager. Then click Save and Close. Then click New.
For the next group, type Membership Team and for the Parent Group, click Newsletter Team.
For the next group, type Events Team. For Parent Group, click Membership Team. Click Save and New. For the final custom group, type Tech Team. For Parent, click Administrator. Then click Save and Close.
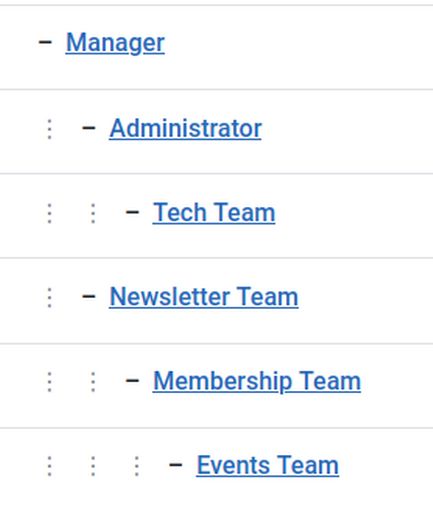
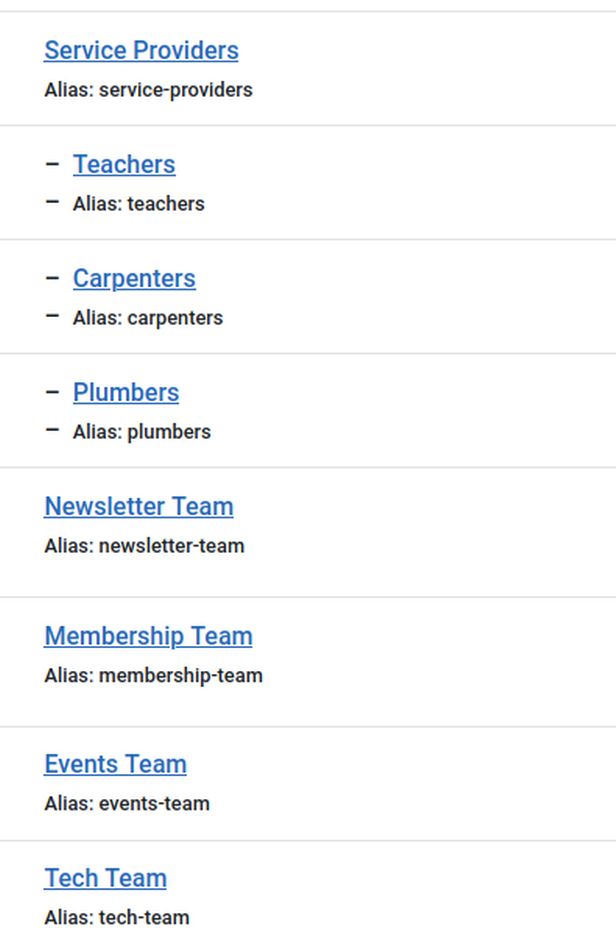
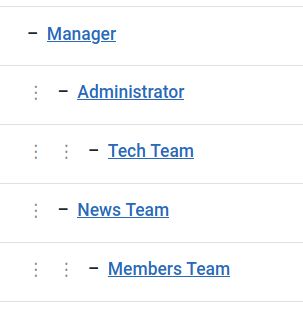
Here are four of our new back end groups in the Joomla User Group page:
#2 Create 3 New Front End Access Levels and Connect them to our 3 Custom Front End User Groups
We next will assign a custom access level to each front end custom group so this access level shows up on our category edit screen, our article edit screen and our menu edit screen as well as on our Component Permissions screens. Each access level will include a check mark for the Super User Group and for the Tech Team Group so that both of these groups have access to the pages of all groups & access levels.
Before we assign access levels to our Service Provider group, look at the Access Levels for the Registered group again.
To determine which boxes to check, ask yourself “Which groups should be able to view articles, categories and menu items assigned to this access level?”
By clicking Managers, Administrators can also see registered content because they inherit all of the abilities of Managers.
By clicking Registered, everyone above them can see Registered Content because they inherit the abilities of Registered Members. Super Users always need to be checked because they do not inherit abilities from anyone else.
To create a new access level, close the Registered Access Level screen and click Users, Access Level, New:
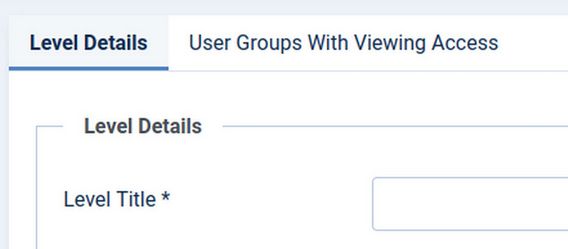
Give the Access Level a Title that is the same as the name of its matching group plus the words “Access Level”. For the first Title, type Service Provider Access Level and check the Service Provider box, the Teach Team box, and the Super User box.
Then click Save and Close.
For the next Title, type Job Provider Access Level and check the Job Provider box, the Tech Team box and the Super User box. Then click Save and New.
For the next Title, type Member Coordinator Access Level and check the Member Coordinator box, the Tech Team box and the Super User box. Then click Save and Close.
Create a Special Admin Access Level
The problem with the Special Access Level is that it includes the Author group which is a Front End Only group. We need an Admin Menu we can place on the Front End but which can only be viewed by back end Administrators. Click Users, Access, New and For Level Title, type Special Admin. Then check Manager and Super User. Checking Manager will give all back end admins access to the front end Admin Menu.
Create 4 New Back End Access Levels and Connect them to our 4 Custom Back End User Groups
We next will assign a custom access level to each back end custom group so this access level shows up on our category edit screen, our article edit screen and our menu edit screen as well as on our Component Permissions screens. Each access level will include a check mark for the Super User Group and for the Tech Team Group so that both of these groups have access to the pages of all groups & access levels.
Next make Access Levels called Newsletter Team Access Level, Membership Team Access Level and Events Team Access Level. For each of these, check Editor instead of Author.
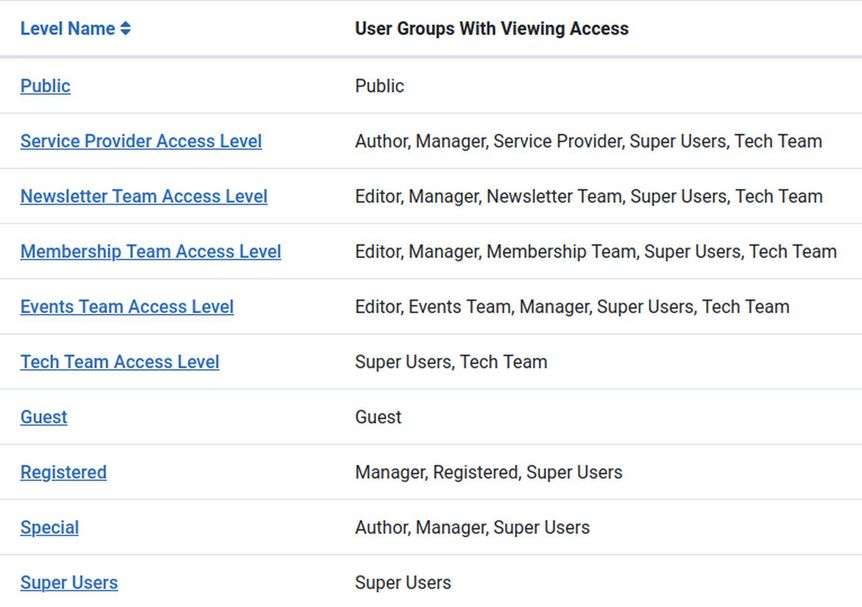
Then make the Tech Team Access Level. Only check the Tech Team box and the Super User box so only these two groups can see these pages. Here are our 4 new Back End Access Levels plus the five default access levels when we are done:
#3 Create New Categories and define Access Levels of each category to match our custom user groups and access level
Go to Content, Categories. We have already created a category called Service Providers to demonstrate how the Service Provider group article creation process works. It has an Access of Public because we want the public to be able to see Profile Page articles created by Service Providers.
Next, cllck New and create a category called Newsletter Team. For Description, type: This is the category for articles by and for Newsletter Team members.
Assign it an Access of Newsletter Team so that only Newsletter Team members (and Super Users) can see this category. Then click Save and New.
Repeat for Membership Team, Events Team and Tech Team. Here are our 5 new categories:
We also need a category for articles we want Service Providers to see but not the normal Registered Users to see. Click New Category. Call this category Service Provider Information. For description, type in: “This category contains articles, tips and other information for our Service Providers.”
Then for Access in the right side menu, click on Service Providers Access Level:
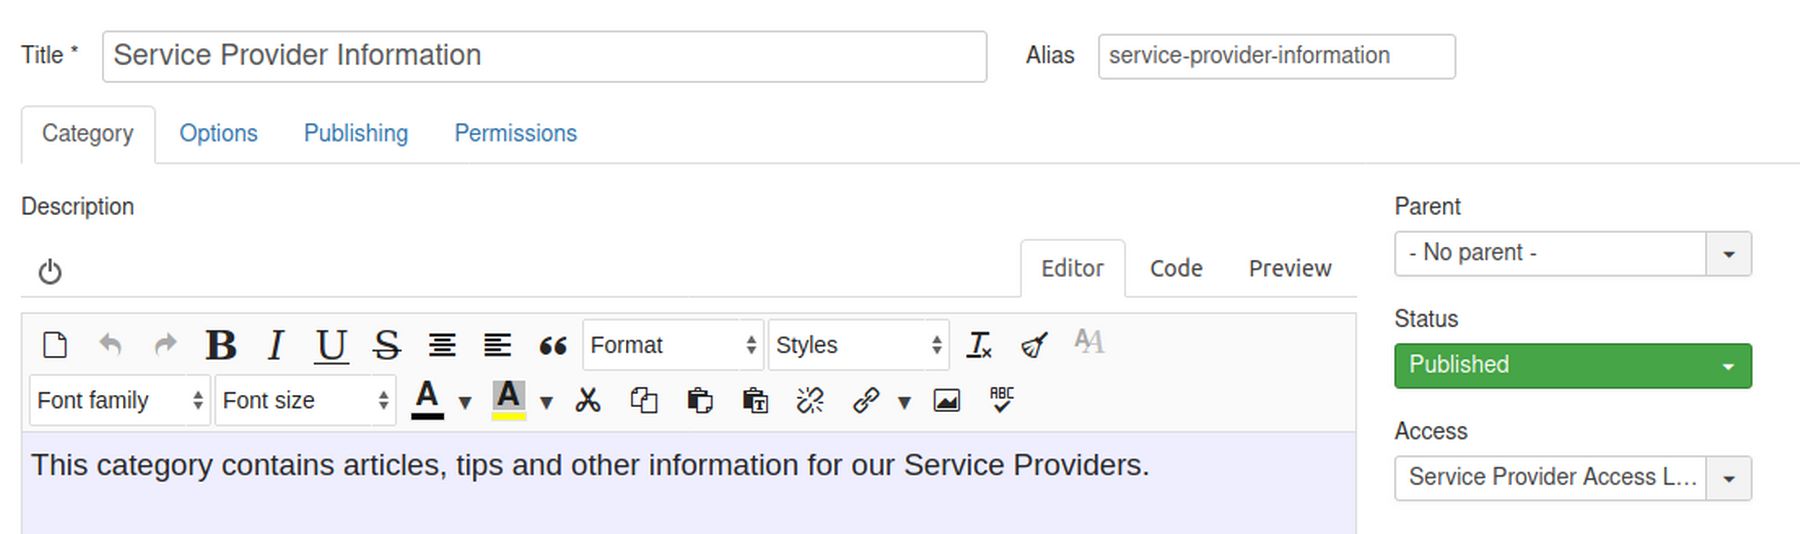
Do not worry about setting the Permissions for this category right now as we will set them up at the Global Level when we are done.
#4 Create 8 New Articles and Assign Articles to Custom Categories or Assign Access Levels for Each New Article
Go to Content, Article Manager, Add New Article. For title, type in Welcome Service Providers!
For Description, type: “We will post more articles here as we get the chance. You can also submit articles to this area of our website which we will then post after they are reviewed. ” For Category, select the Service Providers Information category. For Access, select the Service Providers Access Level.
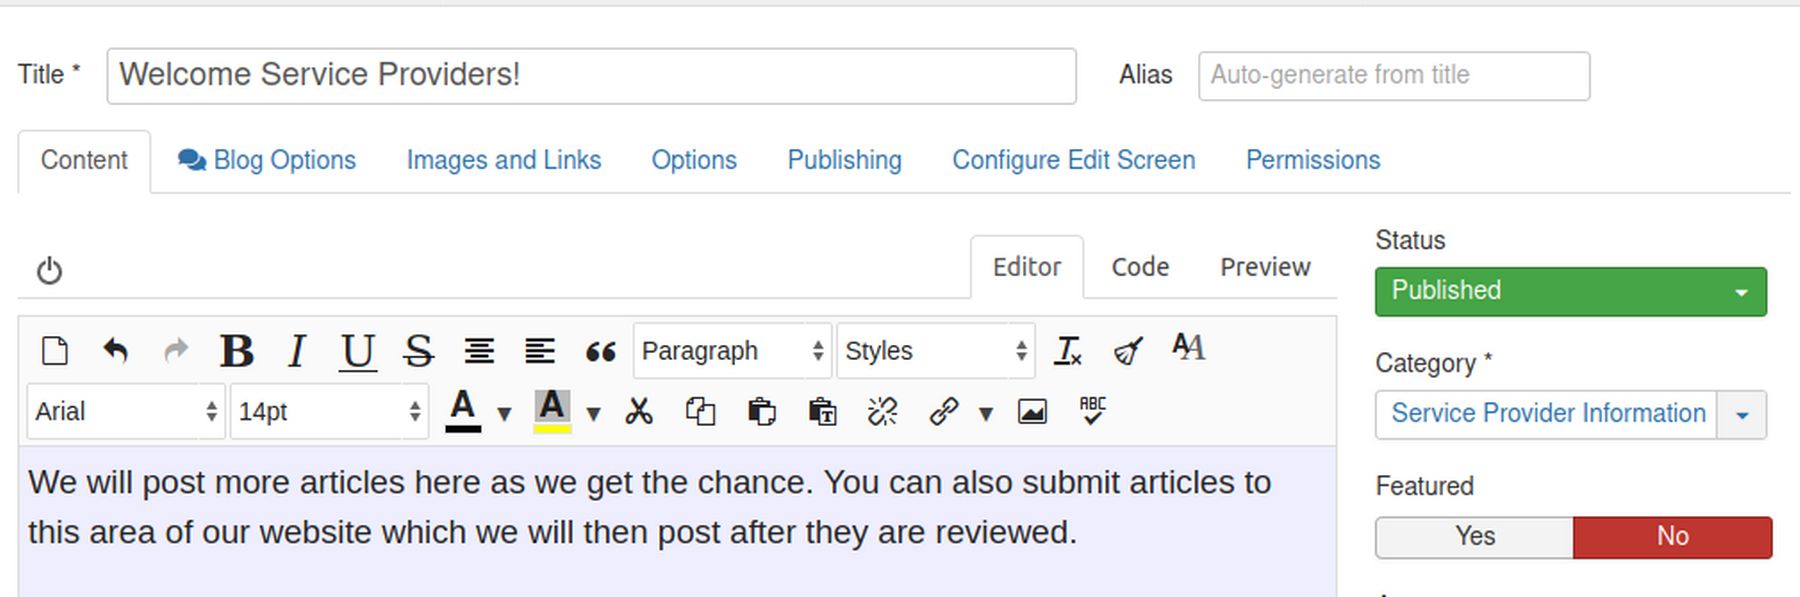
Click Save and New to repeat this process for the other custom group articles.
A second example: Fabrik Friends Custom User Groups and Access Levels
Fabrik Friends is a website intended to improve support for the maintenance and development of the Fabrik Component and Plugins. To achieve this goal, we hope to use Fabrik itself to create a Fabrik community. We have therefore set up the following back end custom user groups: Tech Team, News Team and Members Team.
The News Team will be given back end access to our Newsletter and our Downloads tools. The Members Team will be given access to our Fabrik User Registration system and to our Forum component. The Tech Team will be given access to all areas at the back end of the website except Global Configurations.
In addition, we are creating several Front End User Groups. These include a Member Registration system that allows members to post questions and comments to our Fabrik Forum. In addition, all members have the opportunity to promote their own Fabrik websites. In addition, all members have the option to become "Fabrik Service Providers" and offer their services to those who are interested in developing a Fabrik website. Fabrik Service Providers are divided into three groups. These include Fabrik Website Designers who can help folks set up a Fabrik Website and Fabrik Instructors who teach people how to set up and run their own Fabrik websites.
The third group of Fabrik Service Providers are called Fabrik Application Developers. These are experts who are able to use Fabrik to create all kinds of custom applications.
Finally, the Front End groups include Member Coordinators who can approve new members and assign Service Providers from the front end of our website. Here is a screen shot of our custom Front End groups:
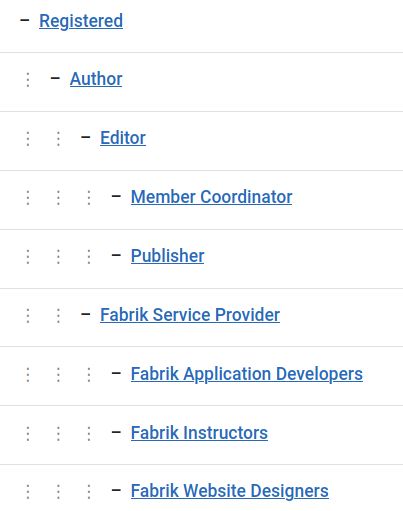
Member Coordinators have the Joomla Editor Group as their Parent All Fabrik Service Providers have the Joomla Author group as their parent. The Author group is the Front End group that is one step above the Registered group. All three Service Provider sub groups have the Service Providers group as a parent. This means each of these three groups will have access to all Service Provider stuff which is to say author plus they will have access to stuff assigned specifically to their group.
Here is a list of how these custom front end groups are assigned to custom access levels:

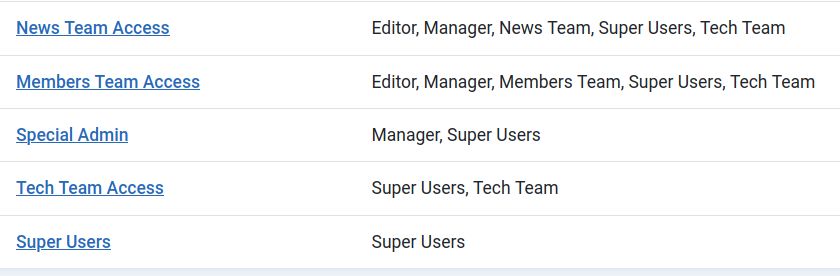
Here is a list of how our custom back end groups are assigned to custom access levels:
Hopefully the above examples will help you achieve your goal of setting up your own custom Joomla User Groups and custom access levels.
What’s Next?
In our next article, we will review steps 5, 6, 7, 8 and 9 of the Custom Group creation process and then test our new Demo network.