
In a previous article, we use the Joomla User Management system to create several new groups and connected them to Access Levels. In this article, we will we will review steps 5, 6, 7, 8 and 9 of the Custom Group creation process and then testing the back end of our new Demo network. But before we drive into the details, we will take a step back and look at the hidden structure involved in building an online community network. As we outlined earlier, an online community network includes several groups. These groups include:
Public visitors to our community network.
Registered Members of our community network who have access to view or see areas of the website that are not accessible to the general public.
Special Registered Members who have the ability to create content on the front end of our website. In our example, we call these Service Providers and Job Providers. But if this were a school organization, they might be called Teachers and the Registered Members might be called Parents and or Students.
Front End Administrators who have the ability to add new members without the need to log into the back end of the website. In our case, we call this group Member Coordinators.
Back End Administrators who can log into the back end of the website in order to post events, create group registration forms, create group events, moderate forums, send newsletter, create events and publish articles written by them or submitted by other members of the community.
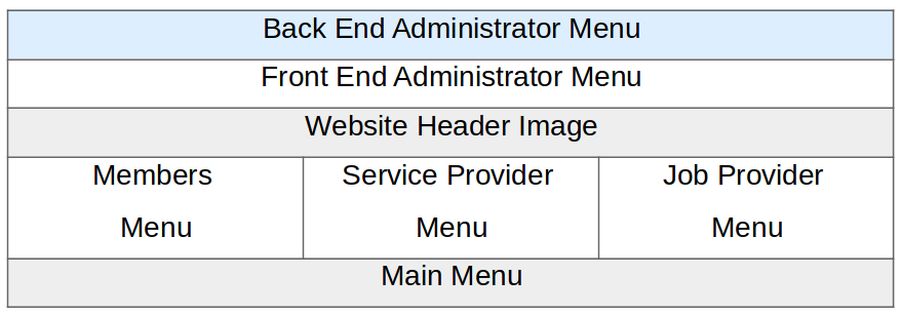
Each of these five groups needs their own place to post and share knowledge. Each of these posts consists of an article which is made visible by creating a menu item linked to the article. While all of these menu items could be placed on a single Main Menu, it is better to create separate menus for each of these five groups.
In our example, this means having a Main Menu for the Public, a Members Menu for Registered Users, a Service Provider Menu for Service Providers, a Job Provider Menu for Job Providers, a Member Coordinator Menu for Front End Administrators and an Administrators Menu for Back End Administrators. Each menu will only be visible to members who log into the front end of the website as a member of the associated group. To make these menus more visible, we will place them near the top of the website, just above or below the header image. Here is a Table showing the layout of these six menus.
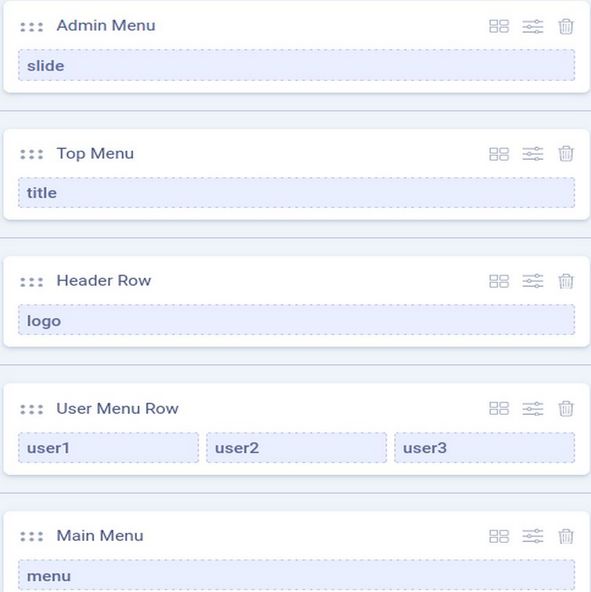
Use the Helix Layout Tool to Create Rows for these Menus
One of the biggest benefits of the Helix template is that we can easily create new rows for our menus. Here is what the layout tool looks like for Our Community Network:
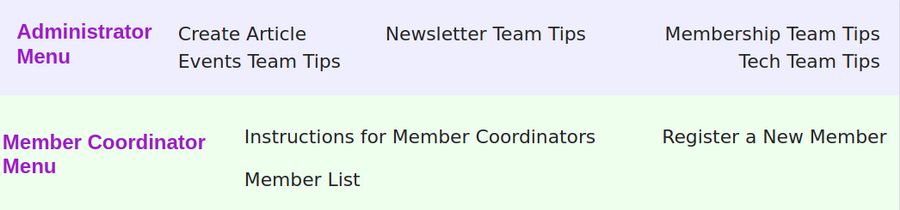
Here is what these 6 menus will look like to an administrator who logs into the front end of our website:
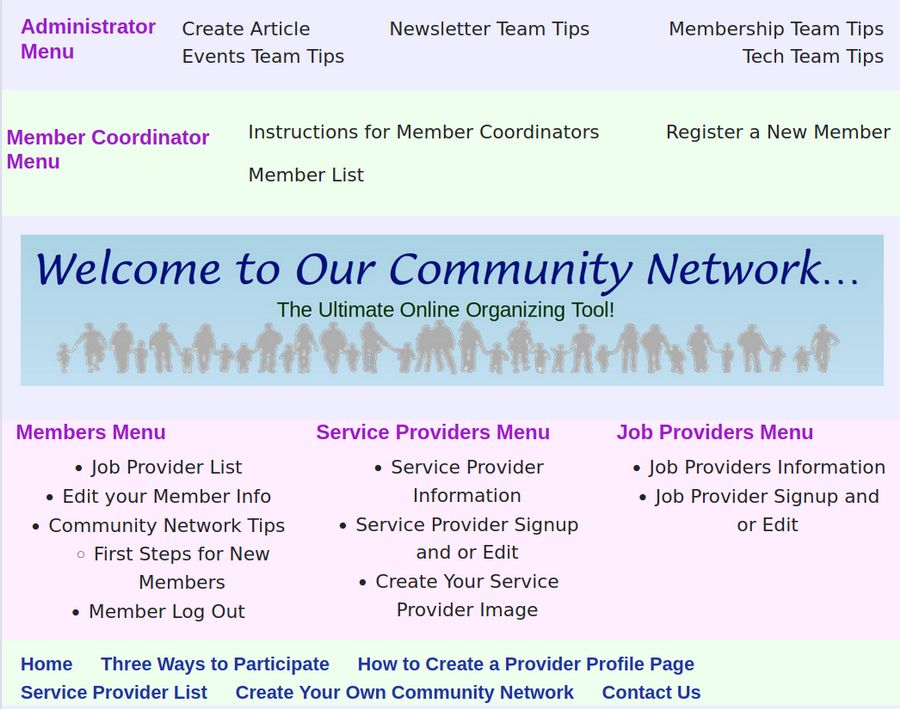
Thanks to Joomla Access Levels, Member Coordinators (after they are logged in to the front end of the website) would see everything except the top row Administrator Menu. General Members would only see the Members Menu and the Main Menu. Service Providers would see the Main Menu, the Members Menu and the Service Provider Menu. The public only sees the main menu.
Now that we understand the eventual goal, let's dive into the details on how to create these six menus and their associated menu items.
#5 Create an Administrator Menu to appear on the top row of the Front End whenever an administrator logs in
Several new menu items will be needed for the Back End Administrators of our website to be accessed by various levels of all 4 new administrator groups. We could just add these menu items to the main menu. But it is better to leave the Main Menu for links needed by the General Public. We will therefore create a new Administrator Menu and place it on the hidden top row of our home page.
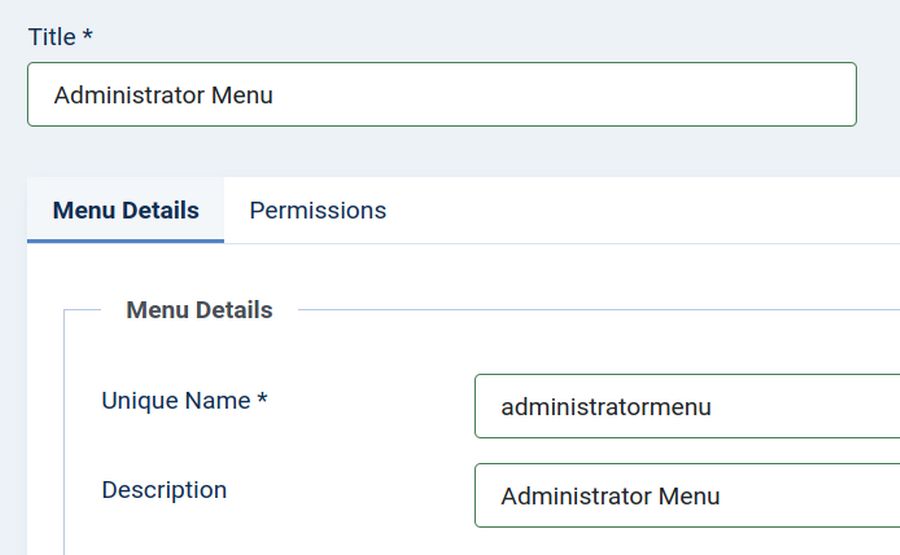
This way whenever an administrator logs into the front end of our website, there will be an obvious new menu that pops up with the links they need to use to go to their particular areas on our website. To create a new Administrator Menu, log in as a Super User and click on Menus, Manage, New. For Title, type in Administrator Menu. For Unique Name, type in administratormenu (no spaces). For Description, type in Administrator Menu.
Then click Save and Close. This will bring us back to the Menu Manager where our new menu now appears in the table of menus:

Click on “Add a module for this menu type.” For Module Title, type in Administrator Menu. For Title, leave it at Show. For Position, click on Helix slide position (which is the module position we assigned to the top Administrator row). For Access, change the access to the Special Admin Access Level. This will allow all administrators access to the Administrator Menu – even though the actual menu items each group sees will depend on the access level of each menu item.
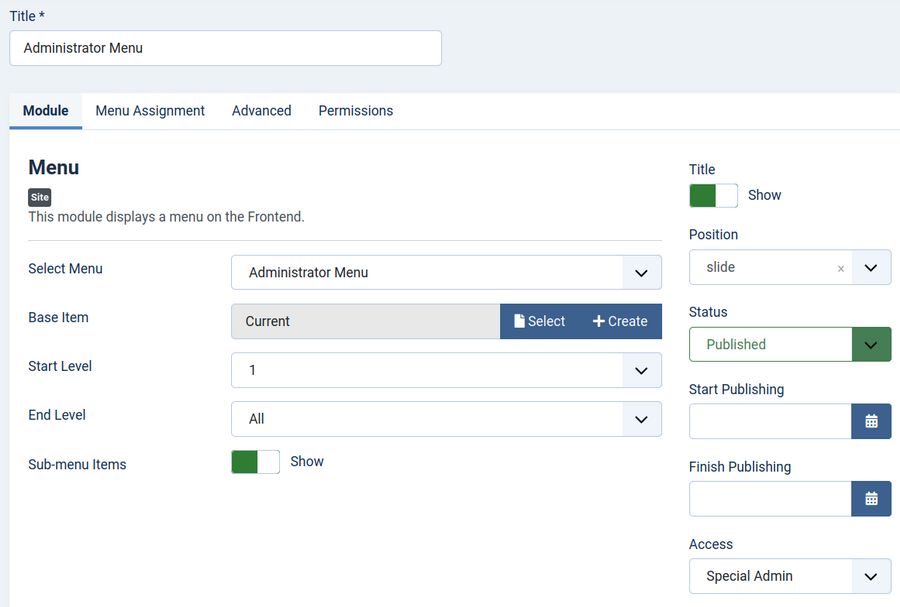
Click Save and Close.
Create Menu Items in the Administrator Menu to Display the Category Blogs and Articles for each custom Admin Group
Click Menus, Administrator Menu and click Add New Menu Item. For type, select Category Blog. Then click on the Newsletter Team category.
For each of the four back end admin groups, use category blogs assigned to their categories. But for access, click on their precise access group. For example, the Newsletter Team Tips Menu Item would be assigned to the Newsletter Team Access Group.
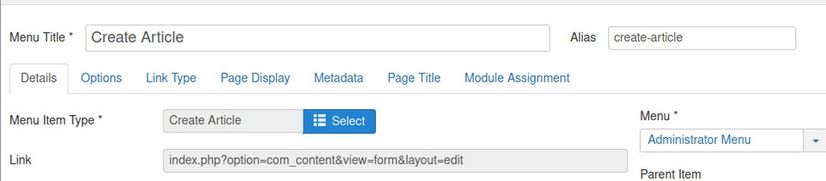
Also go the Create Article Menu Item in the Main Menu and change its location to the Administrator Menu. Then click Save and Close.
This way, when a Newsletter Team member logs into the front end of our website, they will be able to create and edit their articles and add images to their own images folder.
#6 Create a Member Coordinator Menu
To create a new Member Coordinator Menu, click on Menus, Manage, New. For Title, type in Member Coordinator. For Unique Name, type in membercoordinatormenu (no spaces). For Description, type in Member Coordinator. Then click Save and Close. This will bring us back to the Menu Manager where our new menu now appears in the table of menus.
Click on “Add a module for this menu type.” For Module Title, type in Member Coordinator Menu. For Title, leave it at Show. For Position, click on Helix title position. For Access, change the access to the Member Coordinator Access Level. Then click Save and Close.
Create Member Coordinator Menu Items
Go to Content, Articles to create a new article called Instructions for Member Coordinators. Here is the text:
Click on new Member Registration to register new members or click on the Member List to edit existing members.
Then click Save and Close. Then go to the Member Coordinator Menu and click New. For Menu Item Type, click Articles, Single Article. Then select Instructions for Member Coordinators. For access level, select Member Coordinators.
Then click Save and Close. We will later add menu items for Register a New Member and Member List. But these are both Fabrik forms. So we will add them after we create the forms.
Improve Display of the Admin and Member Coordinator Menus
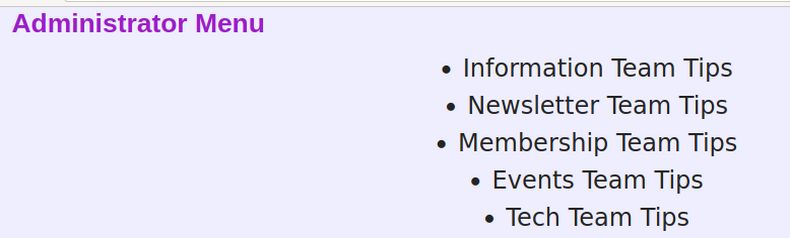
By default, the Helix template displays additional menus in a vertical layout such as shown below:
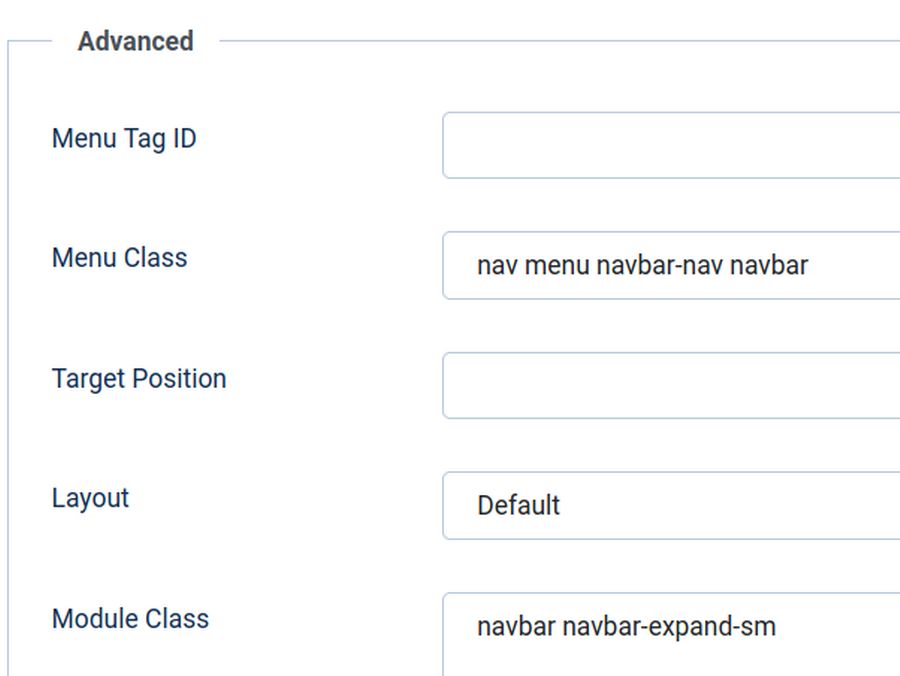
To change the Administrator Top menu to a vertical layout, go to Content, Site Modules and open the Administrator menu module. Then click on the tab "Advanced" tab and add the following to the Menu Class Suffix: (single space) nav menu navbar-nav navbar
Also add the following to the Module Class Suffix: (single space) navbar navbar-expand-sm
Then click Save and Close. Repeat to also change the layout of the Member Coordinator Menu. The log into the front end as an Administrator to view the result.
Leave the Member Menu, Service Provider and Job Provider menus as vertical menus.
#7 Create a Members Menu
To create a new Members Menu, click on Menus, Manage, New. For Title, type in Members Menu. For Unique Name, type in membersmenu (no spaces). For Description, type in Members Menu. Then click Save and Close. This will bring us back to the Menu Manager where our new menu now appears in the table of menus. Click on “Add a module for this menu type.” For Module Title, type in Members Menu. For Title, leave it at Show. For Position, click on Helix user1 position. For Access, change the access to the Registered Access Level. Then click Save and Close.
Create a First Steps for Members Menu Item
In article 2.2, we created an article called First Steps for New Members. Now we will create a menu item for this article and place it in our Members menu. Go to Menus, Member Menu and click New. For Menu Item Type, select Articles, Category Blog. Then click the category called Community Network Tips. Change Access Level to Registered. Then click Save and Close and New. For Menu Item Type, select Articles, Single Article. Then select First Steps for New Members. Place it as a child under Community Network Tips. Change access level to registered. Change the access level to Registered. Then click Save and Close.
Create a Members Log Out article
Next go to Content Articles and create a new article called Member Log Out. Here is the text: Thank you for visiting our Members area and thank you for supporting our Service Providers! To log out, just click on the LOG OUT button below.
Create a Members Log Out Menu Item
Next go to the Members Menu and click New. For Menu Item Type, select Articles, Single Article. Then select the Member Log Out article. Change the menu item to the Registered Access Level. Then click Save and Close.
Add a Members Log Out Module
Then go to Content, Site Modules and click New. Select the Login module. Change the title to Member Login Form. Hide the title and put the module in the bottom1 position, Then click Menu Assignment and click Only on the pages selected. Then check the Member Log In page and Member Log Out page. Then click Save and Close. Later, after we create these forms with Fabrik, we will add menu items for the Job Provider List and Edit your Member Info.
#8 Create a Service Providers Menu
To create a new Service Providers Menu, click on Menus, Manage, New. For Title, type in Service Providers Menu. For Unique Name, type in serviceprovidersmenu (no spaces). For Description, type in Service Providers Menu. Then click Save and Close. This will bring us back to the Menu Manager where our new menu now appears in the table of menus. Click on “Add a module for this menu type.” For Module Title, type in Service Providers Menu. For Title, leave it at Show. For Position, click on Helix user2 position. For Access, change the access to the Service Providers Access Level. Then click Save and Close.
Create Service Provider Menu Items
Go to Content, Articles and click New. For Title, type How to Create Your Service Provider Image. Here is the initial text of this article:
In this article, we will create 9 Service Provider images. You may only need to create one image. But pick an image that is about one and a half times as wide as it is tall. Our goal is to create an image that is 300 pixels wide, 185 pixels tall and with a file size under 100 KB.
We first create an images folder in our file manager. Mine is called 0-provider-images. Then find an image of you or a general image from a search engine. Open a Libre Writer new document. Then copy paste your image into a Libre Writer document. Then right click on each image and click Compress. Change the resolution to 150 dpi. Then click OK. Then right click on the image again and click Save to save the image to your images folder in your file manager. The image file name should be lower case with no spaces.
Next resize each image to a width of 300px. Then click Crop and reduce the height of the image to 185px. There are many Linux graphics programs that Resize and Crop images. Debian 11 has a free tool called Gthumb. But any graphic editing tool will do. Finally, rename and Save your finished image to your File Manager
I saved my first image as provider01-300. We are now ready to load the 300px wide image into our Provider Sign Up form.
Change the access level to registered. Then click Save and Close. Next go to Menus, Service Provider Menu, New. For Menu Item Type, select Articles, Category Blog. Then select the Service Provider Information category. For title, call it Service Provider Information. For Access, click on the Service Providers Access Level. Then click Save and Close.
Then click New. For Menu Item Type, select Articles, Single Article. Then select the Service Provider Image article. For title, type Create Your Provider Image. For Access, click on the Service Providers Access Level. Then click Save and Close.
#9 Assign at least one User to each custom group so we can test our system.
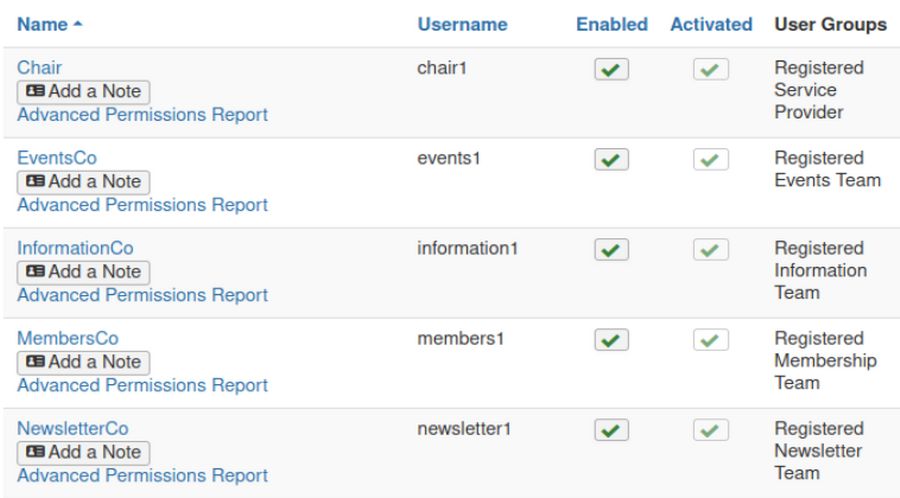
To test our new system, we will need at least one user assigned to each of the new custom groups in addition to our super user. Earlier, we created email addresses for 20 demo group members, We then added 4 of these members using the back end control panel rather than having them register on the front end with our custom Member Registration form. Here we will add the Chair member to the Service Provider group. Click on the Chair to edit this member. Then click Assigned User Groups. Then check the Service Provider box.
Then click Save and Close. Then click on the Events Coordinator to add them to the Events group. Add the Members Coordinator to the Members Group. Add the Newsletter Coordinator to the Newsletter Group. Add the Tech Team Coordinator to the Tech Team group.
We will add our remaining Service Provider members later. Here are our current members and their groups:
#10 Define Precise Permissions for Each Custom Group
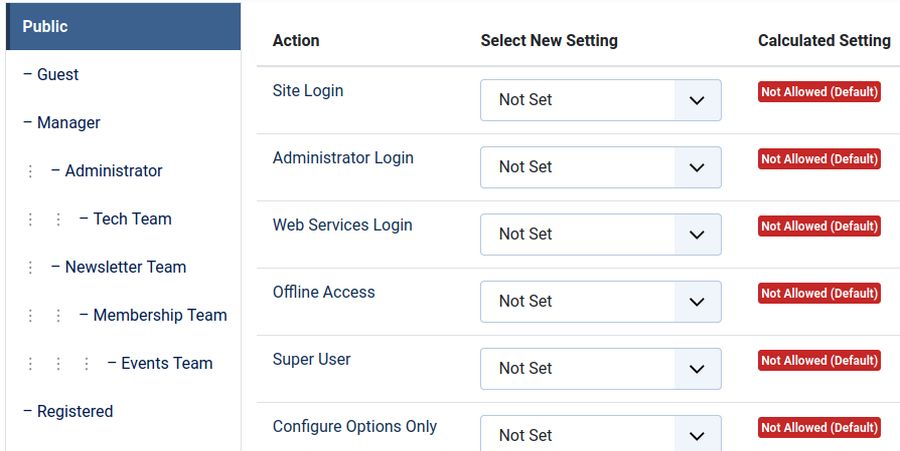
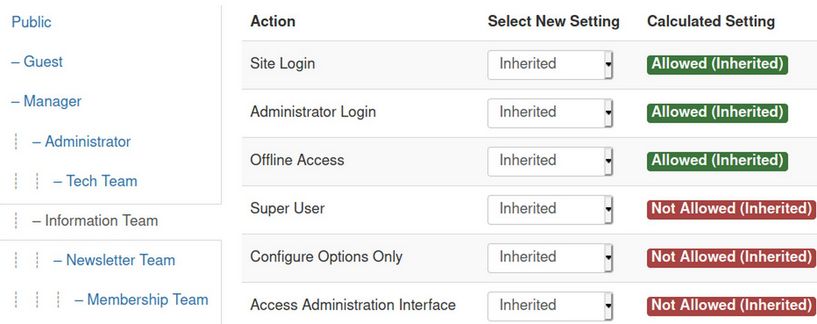
After we have at least one user assigned to each custom group, we are nearly ready to set Global Permissions for each custom group. . Then go to to System, Global Configurations and click on the Permissions tab. Scroll down to the User area. The Permission Setting screen opens at the Public Table which has all permissions set in Red for Not Allowed:
Click on the Registered tab to display the Registered Permissions Table and you will see all they are allowed to do is log into the front end of our website. Then scroll down and click on the Service Providers Permissions Table:

Click on the Author Group Permissions table and you will see that they have the same permissions as the Services Provider group. This is because the Service Provider group inherits their Permissions from the Author group. Namely, the Author and Service Provider groups both have permissions to log into the front end and then create and edit their own articles.
We will next set the Permissions for the Newsletter Team. First we need to install Phoca Downloads and BW Postman Newsletter. We will explain how to use these later. For now, find each in the Joomla Extensions Directory. Then download them and install them. Then click on the Newsletter Team group Permissions Table.
The Newsletter Team is allowed to log into the back end of the website. However, they are not allowed to do Super User tasks. They are also not allowed to edit the Options and Permissions areas. Accessing Administration Interface means being able to access anything by the Global Configurations tab. So it makes sense that this is turned off. What we want is for the Newsletter Team group to be able to access the Phoca Cart Downloads Component.
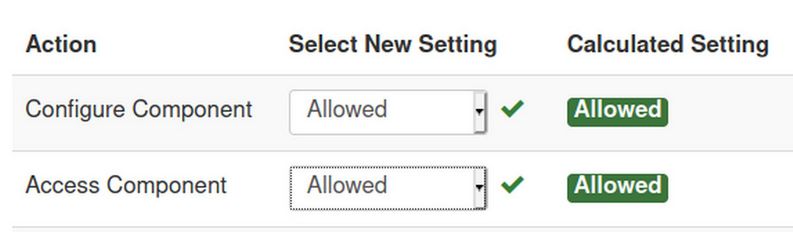
Click on Phoca Downloads in the side menu. Then click on the Permissions tab. Then click on Newsletter Team. Here are the default Permissions for this combination:

Unfortunately, the Newsletter Team is not allowed to access the Newsletter Component. Change Inherited to Allowed for both:
Then click Save. We also want the Newsletter Team to be able to access the BW Postman Newsletter Component. Click on BW Postman. Permissions Tab. Then select the Newsletter Team again. Sadly, the Newsletter Team can not administer BW Postman. Change this from Inherit to Allowed. Then click Save.
Next, we want to give the Membership Team access to the User Manager. Click on Users Permissions. Then click on the Membership Team. Change Access Administration Interface from Inherited (Not allowed) to Allowed. Then click Save.
We will eventually install an Events Calendar. But for now, we will simply give the Events Team access to the entire back end except Global Configurations. So click on Global Configurations at the top of the left side menu. Then click on Events Team. Change Access Administration Interface from Inherited (not allowed) to Allowed. Then click Save.
Finally, click on the Tech Team. This group has the same permissions at the Administrator group which means they have access to all Administration Interfaces (and everything else) EXCEPT they do not have access to Super User settings which means that they cannot access Global Configurations. They also do not have access to Configure Options. Change Configure Options from Inherited not allowed to Allowed. Then click Save.
Then click on the Fabrik component Permissions tab. Click on the Tech Team. Access Administrator Interface is already set to Allowed. But Configure ACL and Options is not. Change it to Allowed. Then click Save and Close. Note that we accomplished all of these Global Configuration settings without using the Deny Option for any action and without changing the settings of the Super User group.
How to Hide Components from the Control Panel Menu
The Component menu has many menu items we do not need. This includes the Banner and Multilingual Components. To simplify things on our Components menu, log into the back end as a Super User and go to Extensions, Manage Manage. Then select the Banners Module and Component. Then click Disable. Then select the Multilingual Association Component and click Disable.
#11 Test our New Access Control System…
Our last step is to test our new access control system. We will not be able to test our front end member access system until after we have created our custom registration form – which we will do in the next chapter. For now, we will just test our back end access system.
Back End Access Control System Tests
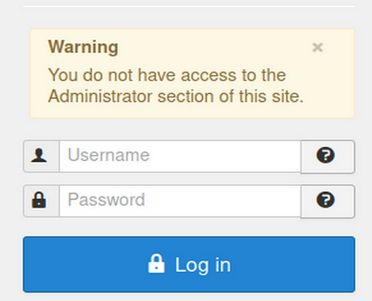
We next need to test the back end access control to make sure that each administrator group has the correct access to the back end of the website and to the correct tools on the back end of the website. Try to log into the back end as a Registered User. Hopefully, there is no access. Then try to log into the back end as a Service Provider. There should also be no access.
Next, log into the back end as the Newsletter Team Coordinator. This time there is access to the back end and also access to Menus, Content, and the Phoca Downloads Manager. There is also access to the Newsletter Component.
Next, log into the back end as the Membership Coordinator. There should be access to the Downloads Manager and the Newsletter Component and the User Group (not the create user groups or access level – only the User Manager).
Next, log into the back end as the Events Team Coordinator. This group should see the same menu as the Membership Coordinator. Next, log into the back end as the Tech Team Coordinator. This group should see all of the tools in the back end with the exception of Global Configurations which is only displayed for members of the Super User group.
What’s Next?
Now that we have a better understanding of the Joomla Access Control System, in the chapter, we will use Fabrik to create our custom Registration form.