
One of the most effective ways to reach a goal or solve a problem is for humans to form a community to work together to achieve a common shared purpose. Fabrik can help us form a more interactive online community. One of the most important steps in building an online community network is creating a custom Member Registration form. While the Joomla Content Management System is a strong foundation for any website, the default Joomla Registration form suffers from two major problems. First, it is not customizable. It can not be adapted to the specific needs of our community network. Second, the default Joomla Registration form does not display a searchable list. Thus, there is no way for members to interact with other members. We will use Fabrik to create custom forms and searchable lists to help community members interact with each other.
Here is an outline of the Fabrik Registration Form Creation Process:
Additional lists and forms to join to the Registration Form
While all members will sign up with the custom Registration form, it is useful to have a separate forms for our special Service Provider members. This will allow us to collect additional information from our Service Provider members and display this information on its own list. It is also useful to allow Service Providers to be able to add their own Provider Category to the Provider Table. We will therefore also create a special Provider Category table. We will then use Fabrik to link these 3 lists, forms and tables together.
Reminder of things to do before you install Fabrik
Below we will focus primarily on the processes inside of Fabrik. Our assumption is that you have already completed all the tasks in Chapter 1 including creating a domain-related email system for sending and receiving emails with members of your community. In addition, we assume you created a Joomla database and website and added the JCE Editor to it in order to automatically create images folders for each new member to keep their Profile Page images in. Finally, we assume you have created a header for your community network website and that you installed and configured the Helix template and written a Welcome article for your Home Page.
Using Fabrik to Promote Fabrik and Build a Fabrik Community
In Chapter 2, we provided a couple of examples of custom Joomla Groups and Access Levels. The second example was for creating an online community to promote Fabrik. We created a News Team, a Members Team and a Tech Team to run the back end of the Fabrik Friends website - which includes managing our Fabrik Downloads component, Fabrik Newsletter component and Fabrik Forum component. We also created 5 custom groups that have access to hidden areas on the front end of our website. These groups included Member Coordinators and Fabrik Service Providers. The Service Providers were then divided into three groups called Fabrik Instructors, Fabrik Website Designers and Fabrik Application Developers. In addition, we will use the Joomla Registered Group for our Fabrik Friends Community Members.
Below is a graphic of our Fabrik Friends community groups.
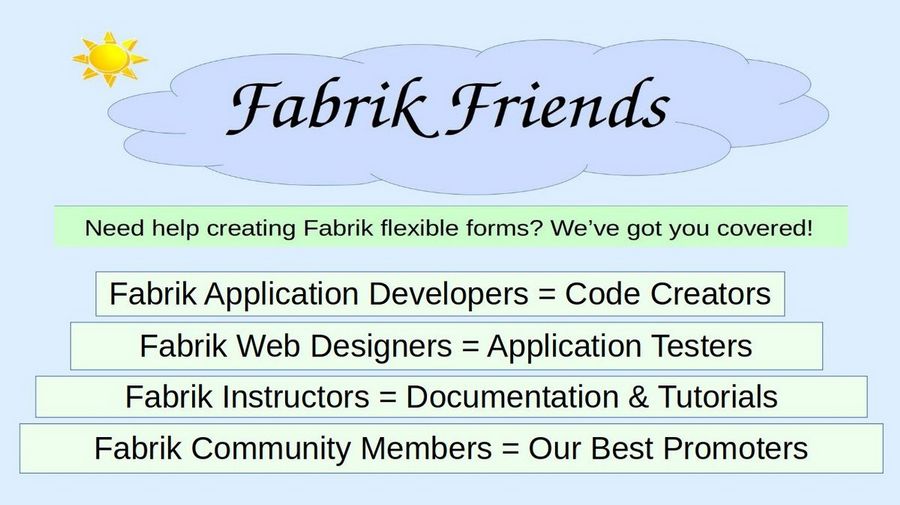
Each of these four groups is an essential part of building our online community. The most important group and the foundation of the community are the Fabrik Community Members. These are people using Fabrik to build their own online communities. These might be corporations, club leaders, school administrators or other open source projects. Without people actually using Fabrik, none of our other groups even matter. Helping these online community users of Fabrik succeed is the most important way to promote Fabrik. If you are a Fabrik user, we hope you will join our community!
Another crucial component of our online community are Fabrik instructors. Clear and well organized documentation can help our community members better understand how Fabrik can help them build their communities.
A third important component are Fabrik Website Designers. By working directly with Fabrik users, well trained website designers can help bridge the gap between the needs of Fabrik users and the complexity of Fabrik Tools.
An equally important component are Fabrik Application Developers. These are folks trained in HTML, CSS and PHP and capable of improving and updating Fabrik code over time. There are three things we as a community can do to help our Application Developers.
First, we can provide an efficiently run website so our Developers do not have to worry about the basics and can spend more time focusing on the actual code. Second, we can provide a way to promote our Developers so that they can earn a living by helping corporations, schools, clubs and other users with specialized Fabrik applications. Third, we can use our website to recruit more Developers so that the entire burden of updating the code does not fall on a small group of people.
Below we will explain in greater detail how we created our Fabrik Friends Community Lists and Forms. But first we will review the Fabrik List and Form Creation process.
Review of the Fabrik List and Form Creation Process
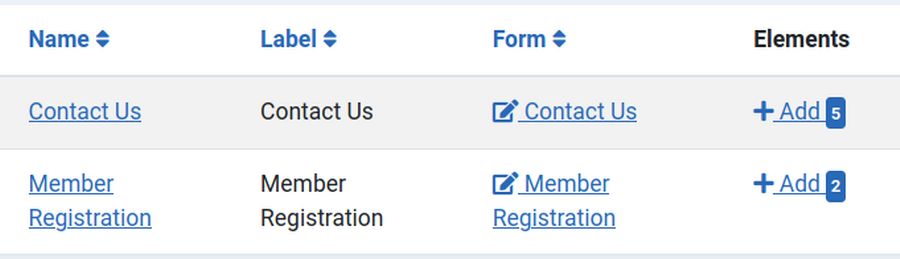
In Article 1.4, we installed Fabrik and used it to create a Contact Us list and form. Let's review the steps we took to create that list and form.
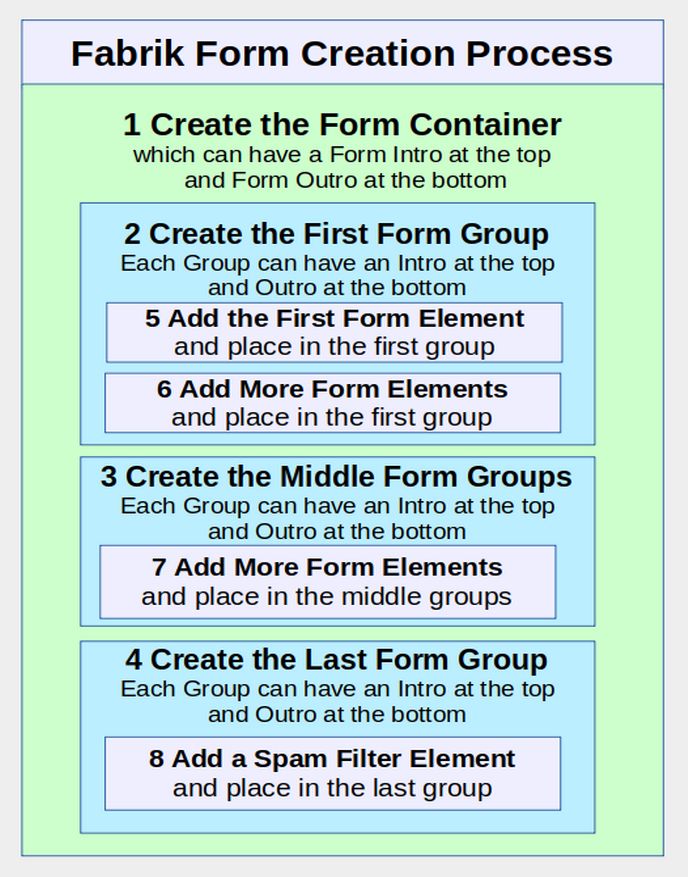
Step 1 Create a New List... when we create a new List, Fabrik will automatically create a matching form.
Step 2 Edit the Form Container... There are several parts of the form container we can edit initial and also later. These include the opening and closing descriptions.
Step 3 Add a Description to the Form Group... Each group or Field Set should begin with a Description. As we will see below, we can have more than one group and each group can have its own questions or elements.
Step 4 Add Elements to your form... There are dozens of elements or question types to choose from. We will introduce the most common elements below. Note that each element should be assigned to a group.
Step 5 Set Elements shown in the back end table... Only some of the elements need to be shown on the back end table or list view. These are typically the name, date and or email address. You choose!
Step 6 Make a Form Menu Item.. As we will see below, you can also make a List menu item to view the list on the front end of our site.
Step 7 Create a Contact Us Notice Article, Hidden Menu and Menu Item... This is needed in order to receive an email whenever a form is submitted.
Step 8 Add the Email Submission Plugin to your form... This will link your admin email address to your form.
Step 9 Add a custom Thank You article... for Members to see after they have filled our and submitted their form.
Step 10 Add a Redirect Plugin to your Form... to connect your Thank You article to your form.
Step 11 Add Form Elements Validation... To make sure that required elements in the form are properly filled out before the form is submitted.
Step 12 Test the Form Thank You result... Fill out a test form and see if the Thank You page appears.
Step 13 Test that the Form Submission Email was sent. Log into your admin email and see if you got an email about the form submission.
Step 14 Test the Form Validation... Fill out the form incorrectly and see if the Validation messages appear.
While these are the basic steps, each form is different and may require a slightly different set of steps. Now that we have reviewed the List and Form Creation Process, let's see how these steps apply to the creation of a Custom Member Registration Form.
Step 1 Create a Custom Member Registration List & Form
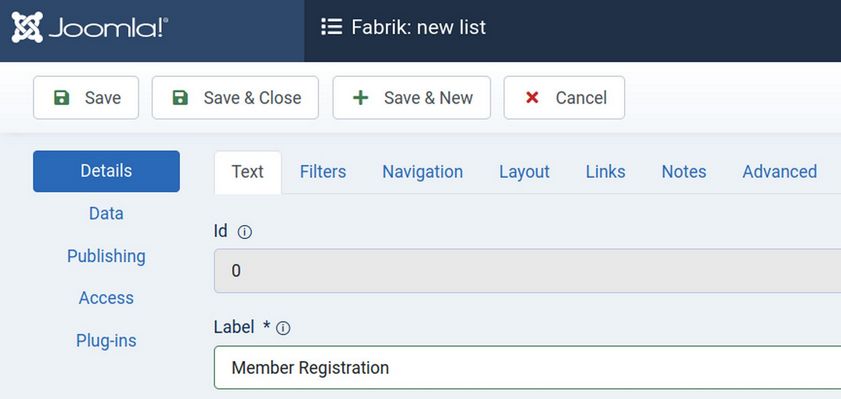
The next step in the Fabrik Community Building process is creation of a Replacement Joomla Site Registration List and Form. Fabrik forms allow us to collect data from new members which we can later display in searchable lists. To create a custom Member Registration List and Form, go to Components, Fabrik, Lists and click New.
For Label, type Member Registration. For now, leave the Introduction box blank.
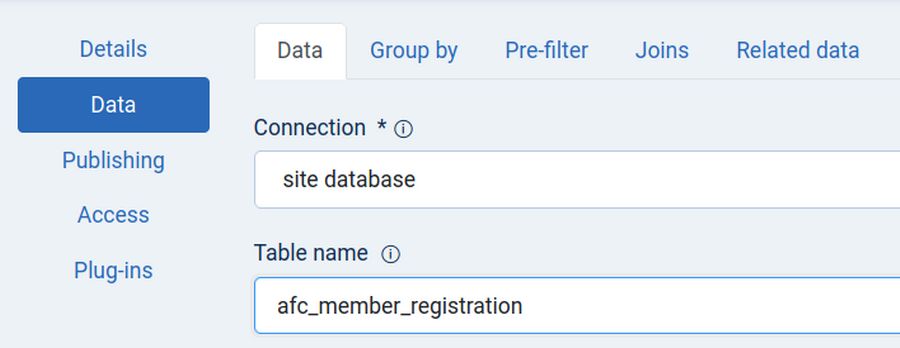
The Fabrik New List screen has five side menu items. These are called Details, Data, Publishing, Access and Plugins. The Details Menu item has 7 tabs called Text, Filters, Navigation, Layout, Links, Notes and Advanced. We will make changes to some of these tabs later. For now, click the Data Side Menu item and add a three digit prefix that begins with a to the beginning of the Table Name. We will use afc which stands for Advanced Form Component. Using this prefix will insure our Fabrik tables appear at the top of our list of tables in our database.
Then click Save. You will see the Fabrik: select content type screen:
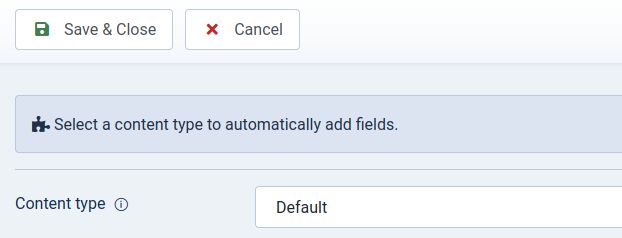
Understanding Fabrik Content Types
Fabrik Content Types are a very important feature. They are a way to create any custom form you can think of and then transfer this custom form from one website to another. We will explain how you can create your own content types at the end of this course after you have completed your own custom Member Registration form. Above, the Content type is set for Default. Note that there are only two elements shown on the Preview box. These are id and date-time.
Use the drop down to change the content type to Contact Us. But do not click Save. The Preview box will show three additional elements. These are Your Name, Your email and Message. Change the content type to Events to see several elements including ID, Create Time, Label, Created by, Updated by, Start, End and Update Time.
You can create new forms later called Contact Us and Events and choose the matching Content type to have complete forms with these fields installed. However, for our custom Registration form, we want to add our own fields. So change the Content Type back to default. Then click Save & Close. Your custom Registration List now appears in the table of Lists.
Step 2 Edit the Member Registration Form Container
Click Components, Fabrik, Forms to see a list of our forms. Then click on the Member Registration form.
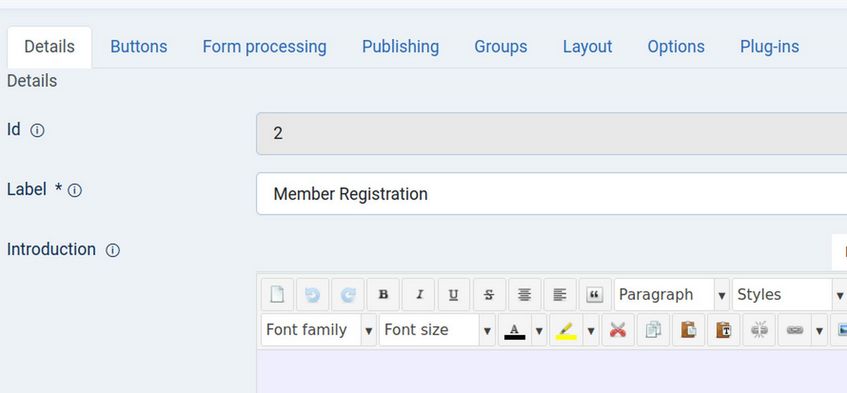
The Fabrik Form screen has 8 tabs. The first tab is called Details. The name of the form matches the name of our Member Registration List. Below the Label box is an area called Introduction. Any text placed in the Introduction box will appear under the Registration form label. You could leave this box blank. But we want to provide new members with some instructions on what our group is about and some tips on how to fill out the form. So type this into the Introduction Box:
Thanks for joining our Fabrik Community! The purpose of our network is to provide a place for those offering Fabrik skills and Services to build relationships with other members of our community. Please fill out the following member registration form completely. Rest assured that your information will be kept secure and never shared with anyone outside of this group. For your Password, please make the password at least 8 characters and include Upper and Lower case letters and numbers. The password should have no blank spaces. You can also include special characters in your password if you wish. For example, you can use a password like JS#2021abc. Please write your password down somewhere to help you remember it.
Click Save and Close.
To edit your new Registration form, click on it to open it. This brings up the Form Edit screen. Then scroll down the Details screen and you will see a box called Error Message. Here you could change the message that appears when the form is not filled out properly. But just leave it blank as we will use the hidden default error message.
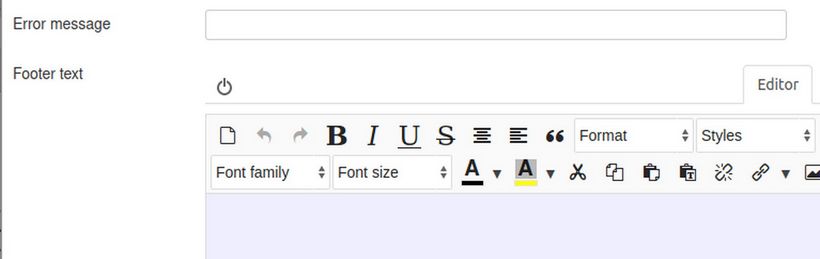
Below this is a box called Footer text. You could add a message to the bottom of the form explaining what will happen after they click on the Save button. But we will skip that for now. Scroll to the top and click on the Buttons tab. There are six buttons here. But five of them are set to Hide. Scroll down to the Save button which is set for Show:
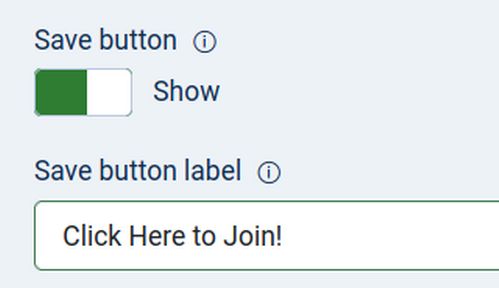
Change the Save button label from Save to Click Here to Join! Then click Save. Then click on the Form Processing Tab.
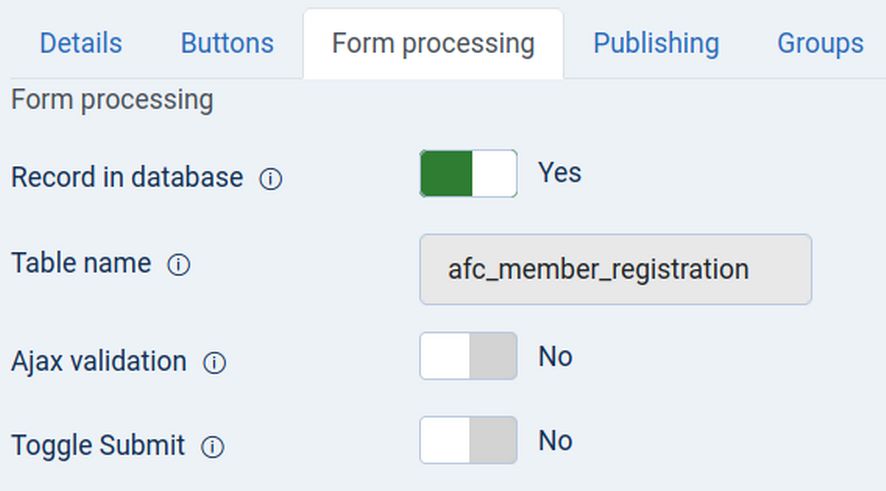
Record in database. Leave this set for Yes.
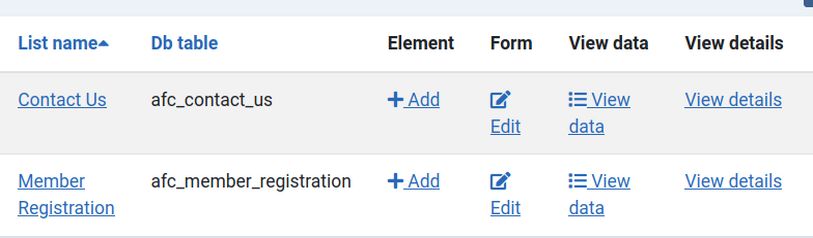
Table Name. Leave this set for afc_member_registration.
Ajax validation: If 'yes' selected then each element is validated as its data is changed. Ajax Validation occurs on the server, so is more secure than JavaScript validation that occurs in the browser. If Ajax Validation is set to No (the default value) then JavaScript validation will display success or failure of the validation next to each element as a real time effect. Whether set Ajax Validation to yes or no, full form validation will always occur when the form is submitted.
Toggle Submit: If set to Yes, this setting will disable the Submit button if any elements have failed Ajax validation.
Success message: The message shown when the form is successfully submitted. If blank, the default message is shown.
Spoof Check: Leave to Yes to keep Joomla’s spoof check active.
Note: Text added to this box is shown as a tool tip when you hover over the form's name in the form list in the Fabrik back end panel. This is only useful if you have a lot of forms with the same or similar names.
Next click on the Form Publishing tab. To display the Member Registration form on the front end of your website, the status must be set to Published. Next click on the Form Groups tab.
Fabrik Form Groups Tab
Fabrik Groups are the equivalent of HTML field-sets. They are used to contain, organize and break up your form's elements into a series of sections. Groups are particularly important with a longer Registration form. Groups also give you a place to add more instructions at the beginning of each group section.
Each element you create is assigned to a group. Your form must have at least one group. Therefore, by default, your Member Registration form will create a group called Member Registration. The Member Registration group will contain the two default elements which are called data-time and id. Note that the Save button element is also created but is not shown on the back end table of Fabrik Elements.
When you click on the Group tab after creating the Registration form, there will only be one group shown in the current groups. It is called Member Registration. However, after you have created the groups you want to add to the Registration form and you have assigned them to the registration form, they will also appear in the Current Groups box.
Here these groups can be removed from the form or moved into a different order on the form. Above this is a box where you can add any groups you have previously created and not yet assigned to a form. Note that you can not assign a group to more than one form.
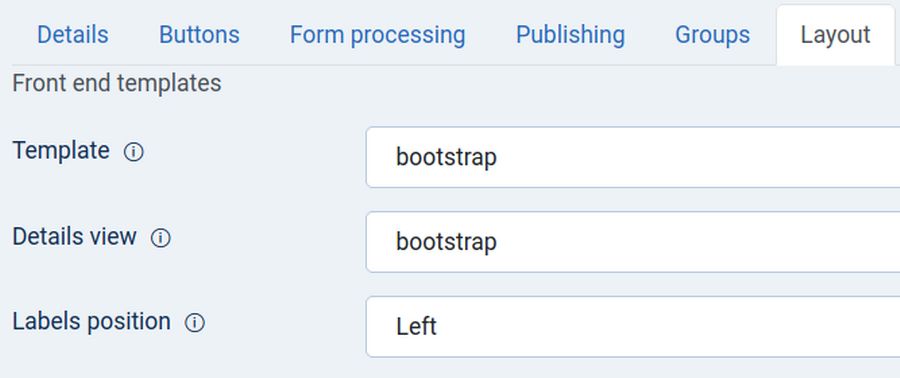
Form Layout Tab: The Layout tab allows you to set which template is used to render the appearance and structure of your form.
We will cover this tab later after we have added some form elements.
Template: There are three options, Default, bootstrap and bootstrap tabs. If you only have one group, the appearance may not vary. But if you have several groups assigned to your Member Registration form, changing from Default to Bootstrap tabs, will turn the groups into a series of tabs which will reduce the need for the new member to scroll down the page to fill out various sections on the form. Form templates are found in /components/com_fabrik/views/form/tmpl.
Each template is contained within its own folder. To create a custom template copy one of the existing template folders, rename it and upload it to your site. There are also some default css styling options for templates which are found in /media/com_fabrik/css/form.css
Detailed view template: The Details view template is used when users are viewing a record. In addition to the three templates above, there is a fourth template here called wellington_pdf
Form Plugins Tab
Fabrik has several form plug-ins that can perform tasks when the form is submitted. To add a new plug-in press the "Add" button. Once pressed you will see some new boxes you can fill out. As we did with the Contact Us form, you can add more than one form plugin to each form. The Add Tab will be at the bottom of the page. Nearly always we will add the email plugin and the redirect plugin to each form. With the Member Registration form, we will also add the Juser plugin
We will add the Juser plugin after we have created some custom groups and added some elements to those custom groups. The Juser plugin will match the Fabrik elements we create with elements that are in the default Joomla registration form. Click Save and Close to close your custom Registration form. Next click on Groups and you will see that when your form was created, Fabrik also created a matching group:
We will add more groups in our next article. Click on Elements and filter for the Member Registration form. You will see that Fabrik also created two elements called id and date-time.
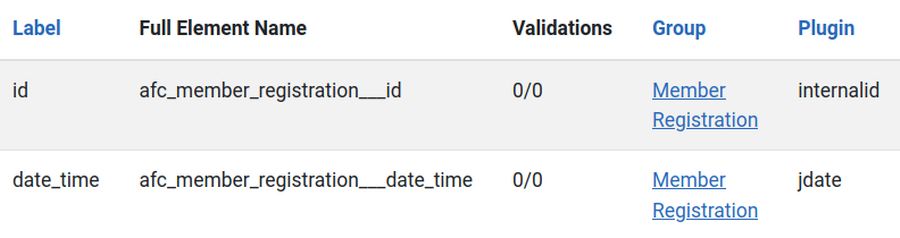
Note that these elements belong to a new group called Registration. Click on Groups to see this new group.
What’s Next?
We now have our custom member registration form with its two default elements. But before we add any more elements to this form, we need to create groups to put the elements in. Fabrik groups are different from Joomla groups in that Fabrik groups are containers for elements while Joomla groups are collections of users or members. In our next article, we will review how to plan the contents in your member registration form and add some custom Fabrik groups to help organize the elements in our form. We will then add some elements to our groups to finish our Member Registration form.