
Another key ingredient in creating a secure website is adding some important Joomla security extensions. Extensions are additional tools for building Joomla websites. In this article, we will review how to add several important security extensions as well as how to install the JCE editor and the Helix Ultimate template.
How to Research Joomla Extensions
Let's begin by going to the home page of the Joomla Extension Directory https://extensions.joomla.org/
Joomla offers three kinds of extensions. These are called Plugins, Modules and Components. Below is a description of each type.
Plug Ins are reached and configured via the Plug In Manager. These are very small bits of code typically inserted into articles.
Modules are Joomla boxes of content. After uploading a new module, it can be found in the Module Manager.
Components are large programs which often include plugins and modules. They may add several pages of options and parameters. After uploading a new component, all components are reached from the Top Menu Components Icon.
The final type of extension is a Combination of the Components, Modules and Plugins typically called Packages. These are Components which may also come with associated Modules and/or Plug Ins. It may require more than one download to make these work. While templates are also Extensions, templates are not posted in the Extension Directory.
Security Extension 1 Brute Force Stop
One of the best security extensions is called Brute Force Stop. It is the third option on the first page. Click on it to see this extension. Here is the direct link to this page:
https://extensions.joomla.org/extension/brute-force-stop/
This plugin stops Brute-Force-Attacks on your Joomla website. One of the most common ways to attack a website is by using tools that keep entering passwords until they find yours. This free tool not only stops these attacks, but let's you know who is attacking you.It includes both a component and a plugin. Click on Download and the extension downloads without requiring any registration. We will install this security tool later in this article.
Security Extension 2 Spam Protection Factory
The first option on page 3 is Spam Protection Factory. Click on it to go to this page:
https://extensions.joomla.org/extensions/extension/access-a-security/site-security/spam-protect-factory
While many security tools allow you to block individual IP addresses that are attacking you, major hackers have thousands of IP addresses. This free tool allows you to easily block entire countries from attacking you or even reaching your login page!
Spam Protection Factory allows you to block all IP addresses from particular countries based on their two digit country code. It includes a component and a plugin. Click on Download which takes you to a page that requires registration of your name (not your website). You can then download the extension. We will install this security tool later in this article.
Security Extension 3 Eyesite
The third security tool I recommend is not in the search box. But it is in the Joomla Extensions Directory. It is called Eyesite. Eyesite is a file monitor that will warn you about any changes to any of the files on your website. Here is the direct link: https://extensions.joomla.org/extension/eyesite/
Download the User Guide and Component from this page: https://www.lesarbresdesign.info/extensions/eyesite
The automatic update plugin costs $20 per year. But Eyesite works very well even without the automatic update plugin. We will install Eyesite later in this article.
Security Extension 4 Remove Generator
A fourth tool is called Remove Generator. The Joomla generator tag is added to the source code page of any Joomla website.
Hackers look for this tag to give them a clue as to how to best attack your website. Therefore hiding or renaming this take can help protect your site. This extension allows us to change the generator tag for our website from Joomla to whatever we want – or remove the generator tag completely. Download this tool. We will install it later in this article. Here is the direct link: https://extensions.joomla.org/extension/site-management/seo-a-metadata/remove-generator/
Security Extension 5 Add Phoca Commander
Installing a File Manager to your Joomla Dashboard allows you to work with files and inspect error logs without going to your Hestia Control Panel User File Manager. The error file is important because it can alert us to security problems in our website core files and extension files. Here is the direct link to download this file: https://www.phoca.cz/download/category/96-phoca-commander-component
Download this tool. We will install it later in this article.
Install and Configure Brute Force Stop
Click on System, Install, Extensions to install this tool. Then click Dashboard, Plugins and scroll down to system plugins. Click on BF Stop to open it. Enable this plugin and lower threshold from 10 to 5. Then lower the duration from 1 day to 1 hour.
Then click Notification and select the Admin. Then lower the blocked messages per day from 5 to 2. Then click Save and Close.
Install and Configure Spam Protection Factory
Click on System, Install, Extensions to install this tool. Then click on Components, Spam Protection Factory Dashboard. Then click Link to enable the plugin. Then go back to the Component and click Options. Then click Filters tab and click the Country Filter. Here is a link to all country two digit codes. https://country-code.cl/
We will block users from Russia and Ukraine. RU and UA
Install and Configure Eyesite
Click System, Install, Extensions to install this tool. Click Components, Eyesite, Configuration. Add your email. Then click Status. Click Scan Now. Wait a few minutes for the first scan to complete. It will eventually say Eyesite is monitoring 8901 files. All of them will be new files. Click Scan Now again. Wait a few more minutes. It will reply that there are no new changes. You can now check your files periodically to see if any of them have been changed and when they were changed.
Install and Configure Remove Generator
Click on System, Install, Extensions to install this tool. Then click on Dashboard Plugins and scroll down to Systems. Click on Remove Generator to edit it. Change Disabled to Enabled and click Save and Close. Then click on the front end of your website. Clear the browser cache. Then right click and click View Source. Check that the generator is now gone.
Install and Configure Phoca Commander
Click on System, Install, Extensions to install this tool. After installing, click on Configure Phoca Commander which will bring up a warning screen. Click OK to bring up the File Manager screen. On either column, scroll down and note that there is no error file. You should periodically check to see if an error file ever appears.
Install and Configure the JCE Editor
We will next add the JCE Editor to automatically create images folders for each new member to keep their Profile Page images in.
Step 1 Add the JCE Editor
The JCE Editor is essential to Our Community Network as it is the only editor that will allow us to set up individual folders for each community member. Here we will show you how to configure the JCE editor so that it automatically creates a separate folder for each new member to store their images and documents in without the risk of other members accessing their personal upload folder. To download the JCE editor, go to this page:
https://www.joomlacontenteditor.net/downloads/editor/core
Then click on Download for the latest version. Then in the Joomla Control Panel, click Extensions, Manage, Install. Then click Browse for File. Then select it. It will install automatically.
Step 2 Configure the JCE Editor for use with Our Community Network
Once we install the JCE Editor, we need to modify it so that it does not allow users access to the website root folder. Also, because the JCE Editor will be used by every member of the community, it is important to set it up to allow every community member access to their own separate folder for storing their own images and other documents.
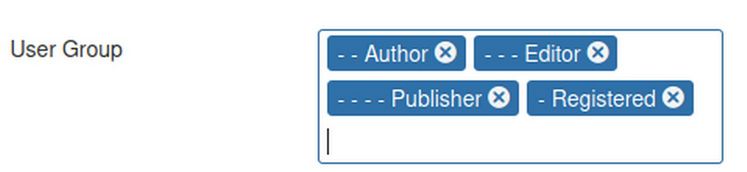
To Configure the JCE Editor, go to Components, JCE Editor, Editor Global Configurations. Then go to Editor Profiles, Default, Setup tab, and scroll down to User Groups. Add Registered Users to the list of permitted users. But delete Managers, Administrators and Super Users as we will soon give them a different JCE Editor. See image below.
Then click on the Features & Layout Tab and reduce the number of tools from four rows to two rows by moving unused icons to the lower area – but moving the font color icon to the upper area. When we are done, this is what the Editor Tool Bar will look like:

Click Save. Then click on the Editor Parameters tab. We will leave URL Conversion set for relative URLs in order to make it easier to copy. But we will need to change it to Absolute URLs for the Administrator Editor for editing the Newsletter component we will be installing later. Then click on the Plugin Parameters tab. Then click on the Image Manager tab and set alignment to Center. Then click Links, and set Target to Open in a New Window. Finally, click Media Support and change Allow Iframes to Yes. Then click Save and Close. We now have the default JCE Editor set up as a normal editor.
Step 3 Create a Second JCE Editor for Administrators
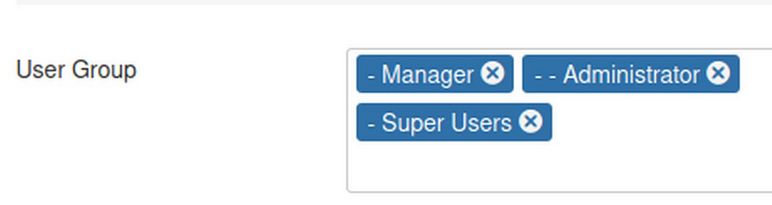
Next click on JCE Editor Profiles. Select the Default Editor and click Copy. This will add another editor called Copy of Default that is exactly like the Default Editor. Click Copy of Default to open it. Change its name to Super User Editor. Change Status to Published. Scroll down to User Group, uncheck all groups except Manager, Administrator and Super Users. See image below.
Then click Save and Close. We now have two published Editors.

Step 4 Create a Personal Document Folder for each Registered Member
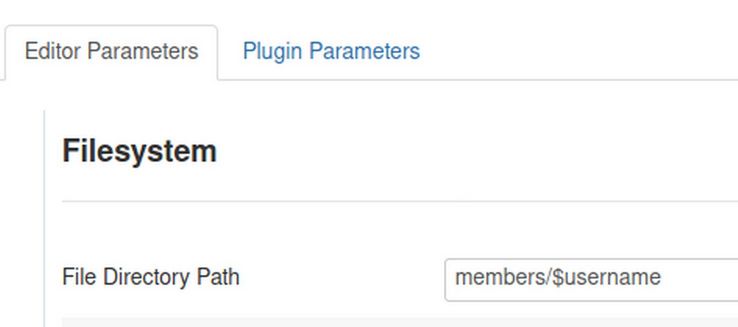
Next, click on the JCE Default editor to open it. Click on the Editor Parameters tab. Then click on the File System tab. At the top of this screen is the "File Directory Path". Set this box for members/$username. (this is read members slash $ user name).
Then click Save and Close. The Default Editor will become the editor for the entire community and will give each person their own uploads folder with their username on it. This folder will be in the root folder for the website. Meanwhile, the Super Admin will retain the normal upload folder called Images which is accessed in the Joomla back end via Content, Media Manager. To finish setting up these dual pathways, in System, Global Configurations, change the Default Editor to JCE Editor. Then click Save and Close.
Step 5 Set the JCE Editor as the Default editor for your website
In Users, User Manager, click on your Super User name to edit the settings. Then click on Basic Settings tab and set the Editor to JCE Editor. Also set the Help Site and Time Zone. Then click Save and Close. While both the Global Configurations and the Super User appear to be pointing towards the same JCE Editor, the Editor will direct Back End Administrators to the Super User Editor and Front End Members to the Default Editor.
Step 6 Install the Phoca Commander File Manager to Create a Community Folder
We need to add a File Manager to the Joomla Control Panel to make File Changes without the need to log into our server. To download Phoca Commander, go to this web page and click Download: https://www.phoca.cz/download/category/96-phoca-commander-component
Then install Phoca Commander by going to Extensions, Manage, Install. Then go to Components, Phoca Commander. Then read the Warning and click OK. The Phoca Commander File Manager now appears. We will use Phoca Commander to create the members folder which will hold the images folders of all of our members. This file manager allows you to quickly create and edit files and folders without needing to log into your Hestia VPS. The File Manager opens at the website root folder. Click New Folder to add a new folder. Then type the word members with all lower case letters in the empty box.
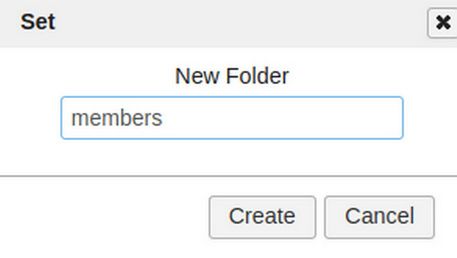
Click Create. Then exit the file manager by clicking on any menu item in the top menu. Now, when a member adds an image to their profile page, the JCE Editor will automatically add a new folder in the members folder using the username of the group member.
Step 7 Install the Helix Ultimate Template
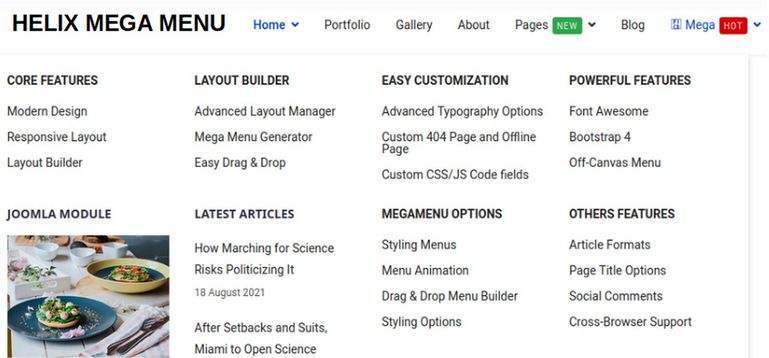
A template controls the appearance and structure of your website. The Helix Ultimate template is a free, open source template that allows you to easily customize the appearance of every aspect of your group website. Helix Ultimate is the only free Joomla template which allows you to easily create your own custom module positions which are responsive rows and columns where you can put boxes of content called modules or feature boxes. Helix Ultimate is completely free to download and use. The Helix template also comes with a customizable Mega Menu allowing you to create an expandable main menu which in turn allows website visitors to visually understand how your group website is structured and quickly navigate to the area of the website they are most interested in.
Crucially, the Helix template also provides you with a way to add more rows of content as your website and group membership grows. To download the Helix Ultimate Template, go to the following page: https://www.joomshaper.com/helix
Then download just the template and system plugin (not the Quickstart package). Go to System, Extensions, Install to install the Helix template. Then go to Template Styles to make it Default.
Step 8 Create a Header Image and Header Module
Before we edit the new template, it will help to create our own header image using Libre Draw and Flameshot. Load the header image by going to Content, Media. Upload, Browse. Select the Image and then click Upload.
To add this image to a Joomla module, go to Extensions, Modules, New, Custom. For Title, type Header. Then Hide the title and select the Helix Logo position. Then use the JCE image icon to select and insert the header image.

Then click Save and Close.
Step 9 Configure the Helix Ultimate Template
To edit the Helix Template, go to Template, Styles and click on the Helix template to open it. Then click on Template Options.
This will open the Helix Ultimate default settings sidebar along with your website homepage. To the left side of the screen, you get the Helix Ultimate default settings options categorized in group called Basic, Presets, Layout, Menu, Typography, Blog, Custom Code, and Advanced. The Basic Tab is divided into categories called Logo, Header, Body, Footer, Social Icons, Contact Info, Coming Soon and Error Page.
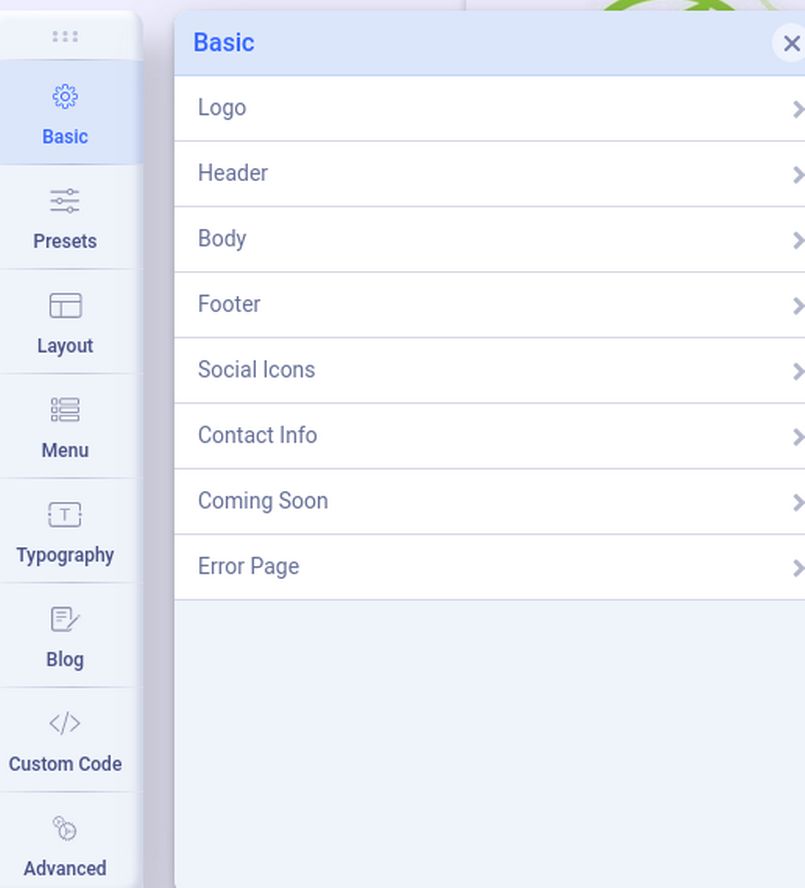
Click on the Logo option. In order to hide the Helix logo and use only our header image, change the logo height to 0. Then click on the Header options. By default, the header is set for Top Bar. Change it to Fullwidth Center . Then scroll down and turn off Search, Log in and Sticky Header. Then click Body and turn on Boxed Layout. Then click on the Footer. Turn off Copyright and Go to Top. Then click Social Icons and turn them off too. Also turn off Contact Info and Coming Soon. Then click Presets and choose a color theme if you want or create your own custom color theme. For example, click on Preset 1. Then click the Edit pencil. Change any values you want. Then click Apply. Then click Layout.
Helix Layout Builder
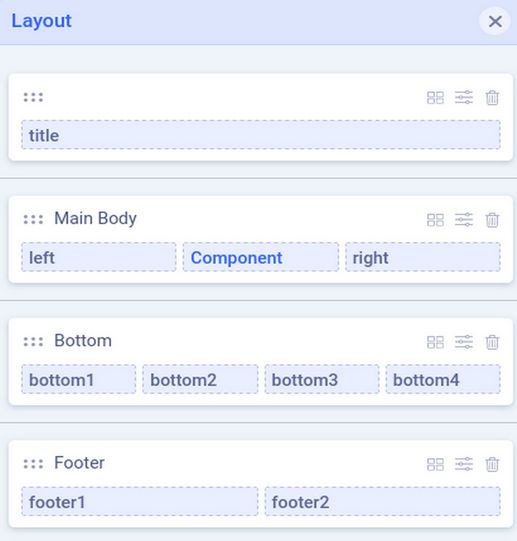
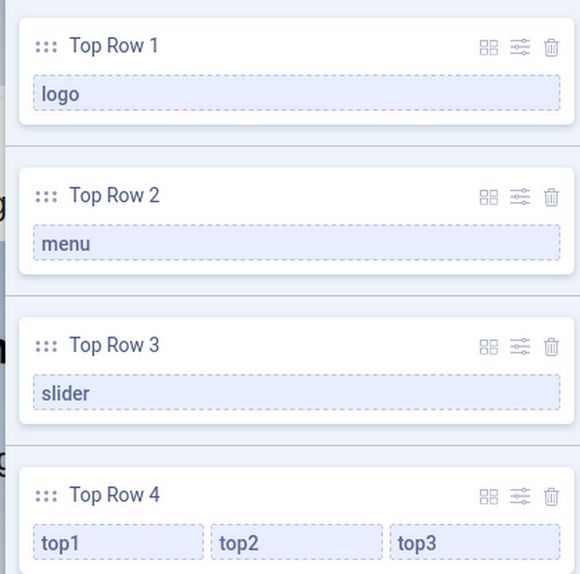
The Helix Layout Builder is one of the most important features of the Helix template. It allows us to precisely control our website layout. The standard Joomla layout consists of a Main Body with the main Joomla Content in the Component position in the middle of the page. There are also module positions to left and right of the main Joomla content component. Helix has added a single row called title above the main content and also two rows, called Bottom and Footer, below the main content area. The first bottom row has 4 columns and the second bottom row has two columns. Our goal is to add four more rows above the main content for a total of five rows above the main content. We will use the first new row for our header, the second new row for our main menu, the third new row for a slideshow and the fourth new row for three feature boxes. To add a new row, hover your cursor over the layout. This will reveal a plus sign. Click on the Plus sign above the Main Body to add a new row.
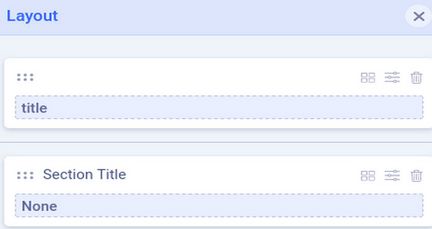
Then click on the plus sign three more times to add three more rows.
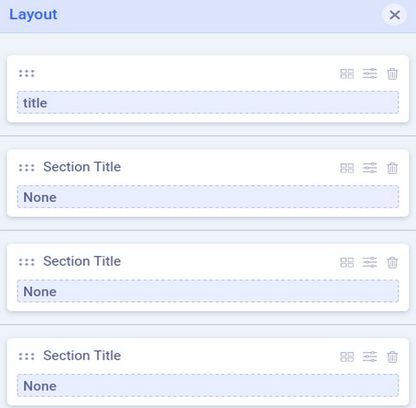
Each row has a Section title and a row name called None. Click on the four squares to the right of the first Section Title.
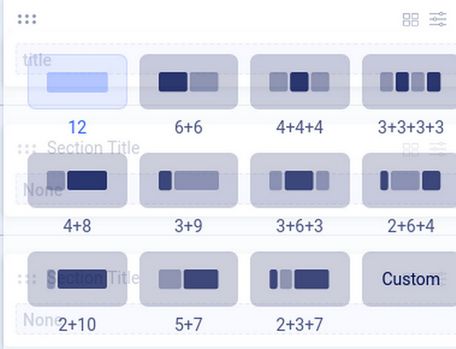
This popup allows us to divide the row into a combination of columns. Because we will use the first row for a full width header, leave it at the default value of 12. But give the lowest row three columns (4, 4. 4). Then click on the arrows to the right of the four boxes for the top Section Title Row.
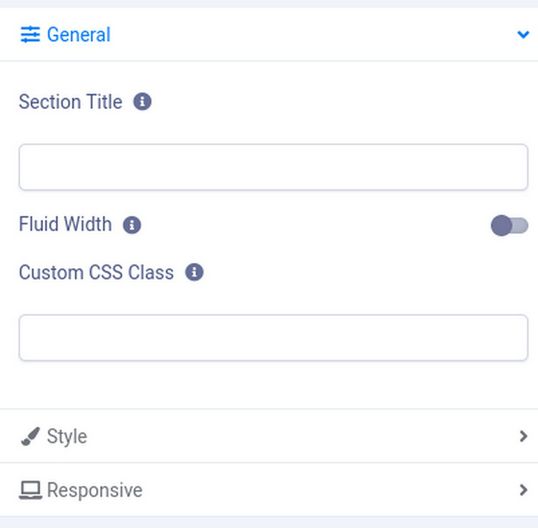
We will call this Section Top Row 1 and check Yes for Fluid Width. Then click on the Style button and change the background color to light blue #eeeeff. Then click Apply. Repeat for Top Row 2 with Light Green and Top Row 3 with Light Purple and Top Row 4 with Light Red. But leave the width with Fluid turned off.
Then click on the three hidden dots to the right of the word None in Top Row 1.
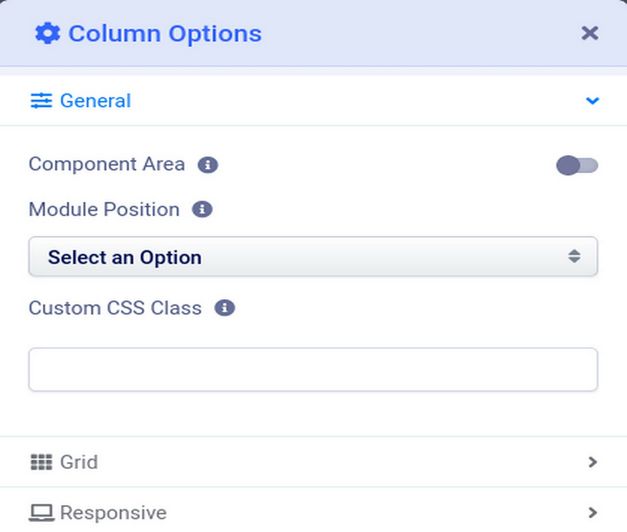
Click on Module Position, Select an Option. This will bring up a list with more than 36 module positions that looks like this:

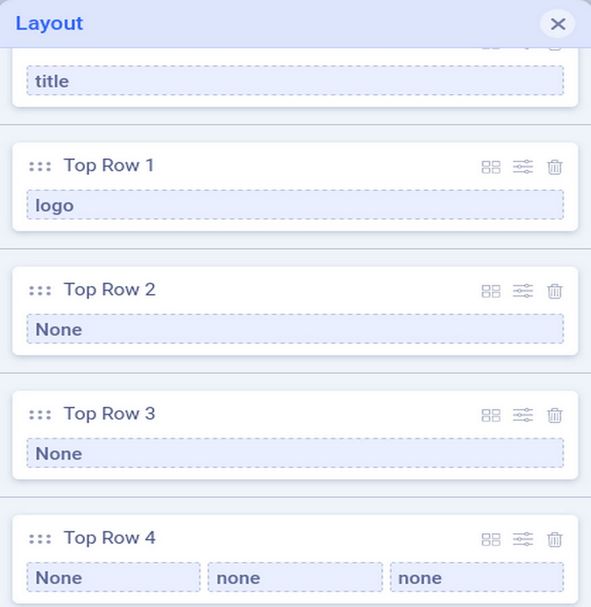
The 9 module positions that have already been taken are title, left, right, bottom 1,2, 3, 4 and footer 1,2. This still leaves us with 27 module positions to display our content. We will call our first row logo as that is the module position we have assigned to our header. This will allow us to put a menu above our header in the future if we wish. Then click Apply. Call the module for Row 2 menu and the module for Row 3 Slider. Top Row 4 has 3 dots to the right of each word None. Call the first box top1, the second box, top2 and the third top3. Here is our new layout:
Close the Layout screen and you will see we have a problem:
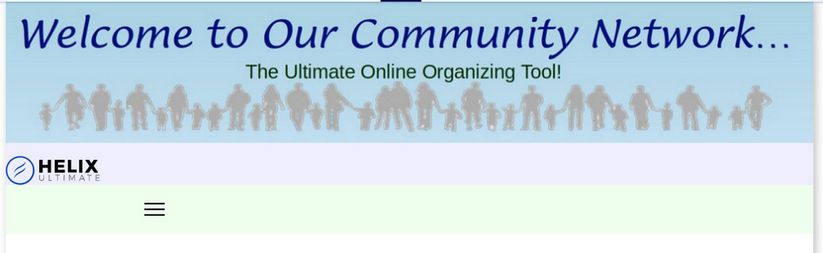
There are now two header images. One is using our full width logo position in Top Row 1. The other header image is not full width and was added to a hidden module position in Basic Settings Header options. The solution to this problem is to click on Basic Header and turn off Predefined Header. This still leaves us with a mobile menu and a menu item called Home in the Top 2 Row:
Click on the screen icons at the top of the template edit screen. Looking at narrower screens brings up the Helix Ultimate logo:
In the Layout screen, click on the menu module position to edit it. Then click Grid and make them all full width. Click on the Mobile top icon. Then click Basic Logo and change the Logo Height (Mobile) to 0. Then click Save. Then click the Tablet icon. Then click Basic Logo and change the Logo Height (Tablet) to 0.
Step 10 Hide the Mobile Menu on Wider screens
Click Menu, Mega Menu. But default, it is set fr Mega Menu and Off Canvas Menu. Use the drop down to change this to Mega Menu Only. The mobile menu will hide on wider screens, but then appear on narrower screens. At the same time, the Mega Menu will hide on narrower screens. Click Save and Close.
Step 11 Add a Helix Template Custom CSS File
There are several minor display problems with the Helix template. Rather than explaining how to fix them one at a time, I have created a free CSS file which you can download from this link: https://createasecurewebsite.com/free-downloads/3-rainbow-modules-css-presets-package
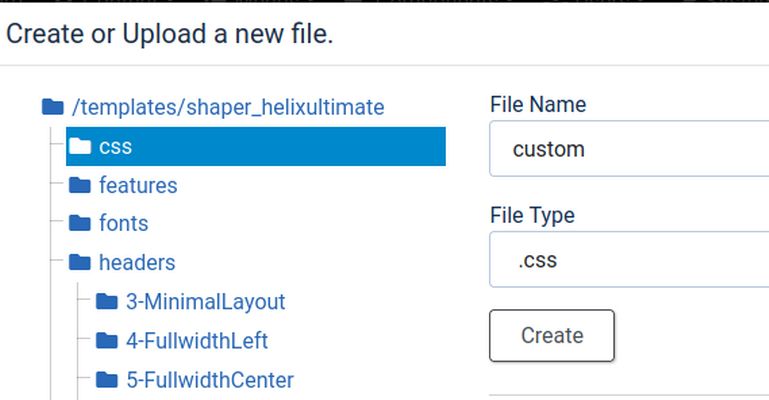
Then unzip the package. Then open the CSS Writer document. Then click Select All and copy the entire file to put it in your clipboard. Then in your Joomla Dashboard, click Templates, Code, Helix, New File. Name the file custom. Change the File Type to css and click the CSS folder to select it. Then click Create.
This will open the custom.css file. Right click and click Paste to paste the css from your clipboard into this file. Then click Save and Close.
Step 12 Add a Featured Welcome article to the Home Page
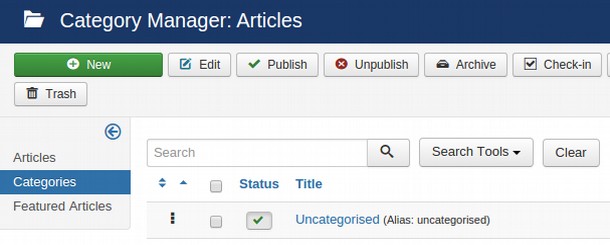
Before we make any articles, we should first create any categories we would like to use. We can add more later. But let's first see how Joomla organizes articles inside of categories. To create a new category, click on Content, Category Manager.
Click on New to create a new category. For Title, call it Community Member Tips. For Description, type in: “This category includes articles explaining how to set up and use our Community Network.” Select the text. Then set the font size for 14. Then Save and Close.
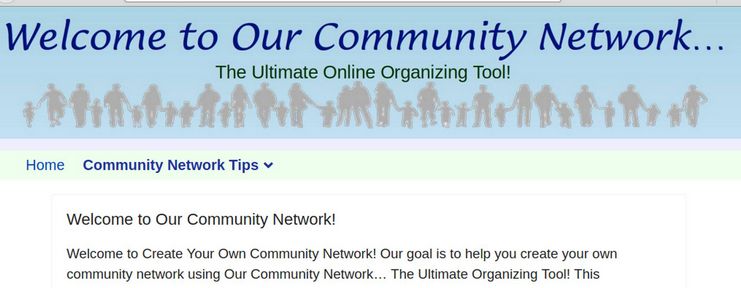
Then click on Content, Article Manager. There are no articles yet. Click New. For the title, copy and paste “Welcome to Our Community Network!” For the description, copy and paste:
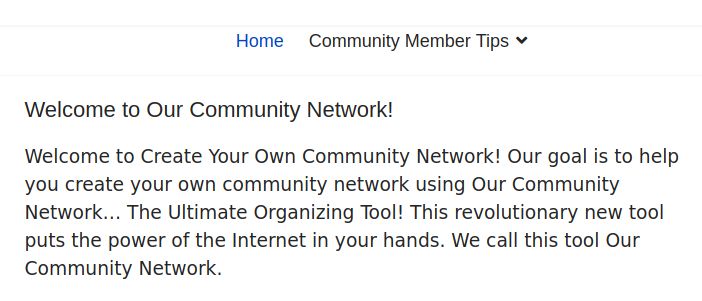
Welcome to Create Your Own Community Network! Our goal is to help you create your own community network using Our Community Network… The Ultimate Organizing Tool! This revolutionary new tool puts the power of the Internet in your hands. We call this tool Our Community Network.
Select the text and set the font size for 14. Change “Featured” from No to Yes. This will put this article on our Home page. Click Save and Close. Then click on the website name in the upper right corner to view the front end of our website.
To hide the Details, which distract from the article, go to Content, Articles and click on Options in the upper right corner. Set Show Category and Link Category to No. Set Show Author and Show Publish Date to Hide. Set Show Tags and Show Hits to Hide.
Then click Save. While we are here, we can click the Category Tab and Hide the Subcategories, No Articles Message and Subcategories Descriptions and Tags. For categories, hide subcategories and # of articles. For the Blog tab, we can change the defaults to 9 leading articles, 9 intro articles, 1 columns and 9 links. For List Layouts, hide Hits and Author. Then save and close.
Step 13 Add a Second Article
There is a problem as we have two menus in the menu row. In order to better understand our menu problems, we will create a second article explaining how to set up and use Our Community Network. Go to Content, Article Manager, Add New Article. For title, type in: First Steps for New Members. For the Description, copy and paste:
This is the page where we will post instructions for first time users of our Community website. It will include a tips on how to set up their own profile page and make connections with other members. It is important with Our Community Network to spend a few minutes setting up your personal profile page properly. To see your current profile page, first log in and then click on View My Profile. To edit your profile, click on Edit My Profile. These two links will appear only after you have logged in. After clicking on Edit My Profile, fill out as many fields as possible. In particular, select a profile image that you like.
Assign the article to the Community Member Tips category. Then click Save and Close.
Step 14 Create a New Menu Item for Community Network Tips
Now that we have a new category, with an article in it, we will create a menu item so folks can see it. Click on Menus, Main Menu, New.
Then click on Select, Articles. Then select Category Blog. This will return us to the Menu Item edit screen. Select the Community Member Tips category. For Menu Title, type in Community Member Tips . Then click Save and Close.
Step 15 Create a New Menu Item for our second article
Click New again. Then click Select again. This time click on Articles, Single Article. Then select our article and call the menu item First Steps for New Members. Click on Parent Item and assign Community Member Tips as the parent. Then click Save and Close. You can check the front end of our website and see that a new menu item has been added to the main menu. Click on it and you will see our second article.
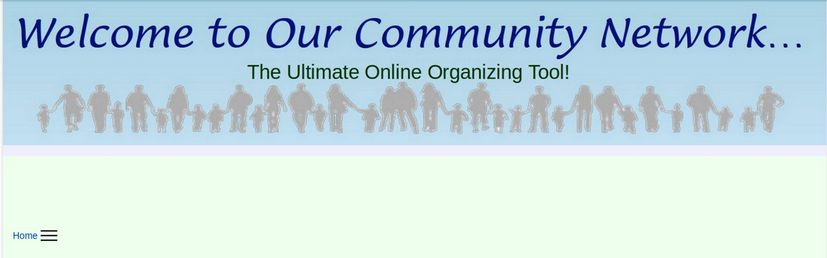
You may have two menus in the menu row. These are a menu created by Helix and a mobile menu also created by Helix. Below this is the word Home which is the page title of the Home page. We can hide the word Home by going to Menus, Main Menu. Then click on Home to edit it. Then click on the Page Display tab. Type Our Community Network in the Browser page title and change Show Page Heading from Yes to No. Then click Save and Close.
Go to Extensions, Modules and you will see that the Main Menu Module is in Position 7. Because the Helix template has no Position 7, the Main Menu module does not appear on the page.
Step 16 Edit the Helix Template to Turn off the Mobile Menu on wider screens when it is not needed
Click on Extensions, Templates, Styles. Then click on the Helix template to edit it. Then click on Template Options. Click on the Menu icon. Then click on the Mega Menu.
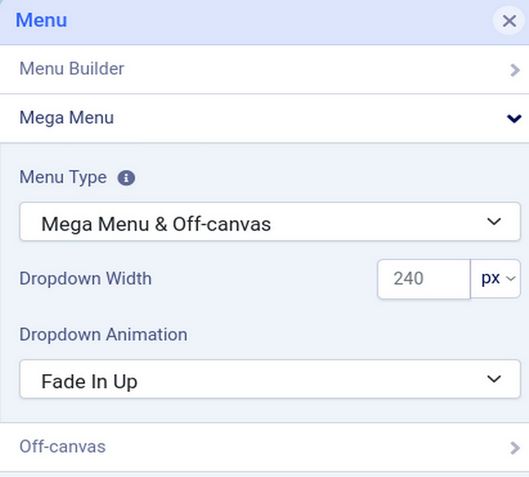
The Mega Menu drop down has three types. These are Mega and Off canvas, Mega only or Off canvas only. Set it for Mega only. Then click Save. Now the Off canvas menu is gone. The Off canvas menu now only appears instead of the mega menu on narrower screens. Depending on the height of your header, there may still be a big gap between the header image and the Welcome article. Go to Basic, Header and reduce the Header height from 60 px to 40 px. Then click Save. There may still be a big gap between the menu and the Welcome Article title. Click Layout, Main Body, Row Options, Style. Change the Padding to 20px. Then click Apply. Then click Save.

The text in the menu is too small to read. Click Topography, Navigation. Change the Weight to Bold, the Size to 20px and the Color to Dark Blue. Then click Save and Close.
Step 17 Hide the Social Icons
As we noted earlier, you should be able to turn off the social icons by going to Extensions, Templates, Styles. Then click on the Helix template to edit it. Then click Template Options. Then click Basic. Then click Social Icons and change the setting to Off. Then click Save. However, this does not hide the social icons on articles. To turn these off, you need to click Blog, Details, Social Share, Off. Then click Save. Then click Close. Then clear the Joomla cache. Then clear the browser cache.
What’s Next?
Now that we have installed and configured the JCE Editor and the Helix template, we are ready to install Fabrik and use it to create our first Fabrik form.